
 Español

What Putty to Use for Miniature Conversions (Complete Guide)
- 09/14/2026 09:13:30
- Home , Assembly and Painting Guides
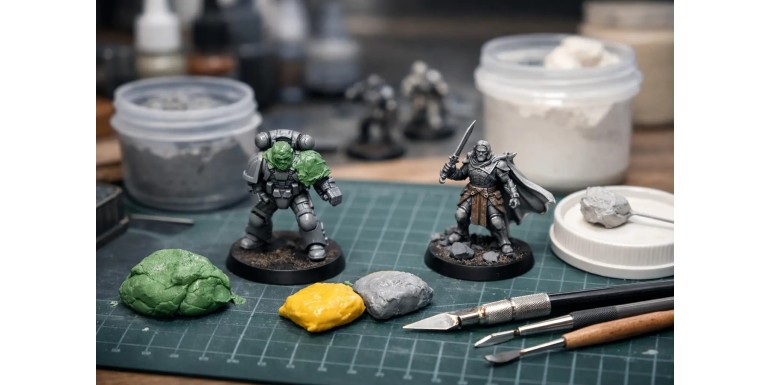
A brilliant kitbash can be ruined by a sloppy joint line—or by choosing a putty that is too soft for structural support. If you are asking yourself what putty to use for miniature conversions, there isn't a single universal brand: the right choice depends on whether you need to rebuild bulk volume, sculpt a flowing cloak, conceal a mold seam, or add fine detail to a plastic, resin, or metal model.
The correct epoxy putty makes a swap head look like it came straight out of the original box, ensures a sculpted cape hangs naturally, and keeps custom display bases intact during transport. Making the right choice starts with understanding how each modeling compound works rather than reaching for whatever tube happens to be open on your workbench.
1. Choosing the Right Modeling Putty by Application
For most miniature conversions, two-part epoxy putties are the most versatile starting point. They consist of two components mixed in precise ratios, cure via chemical reaction, and adhere strongly to plastic, resin, and metal when applied to clean surfaces. However, key differences exist within this product category:
Green Stuff (Kneadatite) for Organic Sculpting
Green Stuff is the industry standard for modeling organic shapes. It remains pliable before curing, retains slight flexibility once fully hardened, and excels at sculpting folds, straps, hair, skin, cloaks, tentacles, and seamless transitions between merged bits. It is also exceptional for integrating arms, weapons, or heads from different kits.
-
Limitations: Green Stuff retains slight elastomeric flexibility after drying, making it harder to sand completely flat. It is not ideal for flat armor plating, smooth vehicle panels, or sharp mechanical edges like power swords. While it can be carefully sanded, it does not set rock-hard like mineral-filled putties.
Rigid Epoxy Putties (Milliput, Magic Sculpt) for Structural Bulk
For filling large gaps, rebuilding sharp corners, or sculpting surfaces you intend to sand down later, mineral-loaded epoxy putties like Milliput or Magic Sculpt are superior choices.
-
Curing Properties: They cure rock-hard and can be easily cut, drilled, shaved, and sanded.
-
Best Uses: Ideal for wargaming terrain, display bases, vehicles, and large miniature monsters where you need to rebuild structural bulk without the material deforming under tool pressure.
Fine-Grain Epoxy Putties for Mixed Detailing
Fine-grain epoxies bridge the gap between structural gap-filling and precision modeling. They are a great alternative if you want to combine bulk-building with fine detail work on a single kitbash. Always test a small sample before applying it to a prize miniature: some formulations are sticky, others have very short pot lives, while others smooth exceptionally well with water.
2. Green Stuff for Cloaks, Flesh, and Organic Details
Green Stuff shines when your conversion requires visual continuity—such as swapping a weapon and needing to resculpt a sleeve, padded armor, or a partially concealed hand. Its adhesive tack and flexibility give you ample working time to push, pull, and smooth the material without cracking.
Mixing Ratios and Pot Life
1. Mix the yellow and blue strips until you achieve a uniform green color.
2. More Blue Component: Results in a firmer, stiffer mix ideal for self-supporting shapes and sharp edges.
3. More Yellow Component: Yields a softer, stickier mix that works well for blending fine seams, though it loses detail retention.
Pro Tip: Don't stress over exact custom ratios starting out. Use a balanced 50/50 mix and control the hardness simply by letting the mixed ball rest on your desk for 10–15 minutes before sculpting.
Newly mixed Green Stuff is extremely tacky, making it great for anchoring initial masses. As it rests, it becomes easier to shape. When it begins to firm up, it enters the optimal window for detailing leather textures, fabric folds, or strands of hair without crushing the silhouette.
Always lightly lubricate your sculpting tools with water, diluted petroleum jelly, or specialized sculpting lube to prevent sticking. Use small amounts—it is far easier to apply a second layer of Green Stuff than to carve away an oversized blob from a 28mm or 32mm scale face, hand, or emblem.
3. Rigid Putties for Armor, Vehicles, and Scenery
When a conversion calls for crisp edges, flat panels, or load-bearing volume, rigid epoxy putties hold the clear advantage. Mineral-filled epoxies allow you to repair chipped resin corners, close wide gaps on tank hulls, or build jagged rocks and ruins for scenic bases. Once cured, they take fine-grit sandpaper and hobby knife carving effortlessly, which is essential for recreating straight mechanical lines.
However, rigid putties are less forgiving with tiny, flexible details:
-
Texture can be slightly chalky or grainy.
-
Ultra-thin feather edges may chip if over-worked.
The Two-Layer Hybrid Technique
A highly effective kitbashing method is combining materials. Fill the core of a deep void or large gap with rigid putty like Milliput. Once cured, apply a thin top layer of Green Stuff to sculpt fine exterior details. This saves expensive sculpting putty and yields a seamless transition around the converted area.
4. Acrylic Putties & Liquid Solvents for Fine Seams
Liquid acrylic putties (such as Vallejo Plastic Putty or Perfect Plastic Putty) are designed primarily to fix fine mold lines, hairline joints, and surface micro-pores:
-
Applied directly from the tube or bottle.
-
Cleaned up easily with water or a wet cotton swab before drying.
-
Perfect for preparing plastic model kits, buildings, and terrain.
Important Note: Acrylic putties are not structural. They cannot bear load or hold heavy conversion bits. If a component must support weight—such as an arm holding a heavy resin weapon—glue it first and reinforce it with a metal pin. Acrylic putty should only be used to seal and finish the surface seam.
Liquid plastic cements and solvent-based fillers melt polystyrene surfaces slightly to erase thin join lines on plastic models. These are unsuitable for resin or metal kits, require good room ventilation, and must be applied sparingly; excessive solvent can melt away surrounding rivets, panel lines, or crisp surface details.
5. How Model Material Impacts Your Putty Choice
Different miniature materials require different conversion preps:
-
Plastic: Clean the bits, scrape away flash lines, and glue the joint secure before applying putty. For deep joins, lightly score the interior plastic so the putty has a textured surface to grip.
-
Resin: Wash parts in warm soapy water first to remove mold release agents. Inspect for air bubbles or warping before attempting any conversion work.
-
Metal: Epoxy putties adhere well to metal, but structural strength relies on proper mechanical anchoring. Heavy metal miniatures with long spears, wings, or bulky bits must be pinned using brass wire. Green Stuff can hide the join and recreate straps or cloth over the pin, but it should not bear the physical weight alone.
-
3D Printed Resin: Verify the print is fully post-cured. Epoxy putties adhere well, though lightly scuffing the surface improves mechanical grip. For pronounced layer lines, a fine liquid acrylic filler or brushable primer filler is far more efficient than relying on sculpting putties.
6. Step-by-Step Process for Clean Conversions
1. Dry Fit Everything First: Test your pose, weapon angles, and contact points before applying glue or putty. A misaligned conversion cannot be fixed by slapping on extra sculpting material.
2. Glue and Pin First: Secure the joint with super glue or plastic cement (and brass pins if necessary). Let the adhesive cure fully before sculpting around it. Tool pressure can easily pop a freshly glued joint.
3. Form Silhouettes Before Texture: Apply putty in thin layers. Focus on the main shape first. From gaming distance, a cape must drape naturally and a shoulder must maintain proper mass. Add seams, rivets, or scales last.
4. Allow Full Curing Time: Let the material cure completely before sanding, carving, or priming. Rushing this step results in fingerprints, distorted edges, or sanding dust embedded into soft putty.
Common Miniature Conversion Mistakes to Avoid
-
Using Green Stuff for Everything: While iconic, Green Stuff isn't always the right tool. Use acrylic putty for micro-gaps, rigid epoxies for bulk and sanding, and Green Stuff for organic sculpting.
-
Rushing in a Single Session: Working in successive layers allows you to rest your tools against cured areas without crushing previous work. If adding fresh putty over cured epoxy, lightly scratch the hardened surface to ensure strong adhesion.
-
Contaminating Your Work Area: Keep hands and tools free of wet glue, resin dust, or excess lubricant. Oils or uncured glue ruin putty adhesion and create painting problems later.
The best putty isn't the most popular one—it's the one designed for the specific job at hand. Keep a flexible sculpting putty for organic details, a rigid epoxy for bulk and sanding, and a fine acrylic filler for hairline seams. With these three tools on your bench, you can tackle everything from a simple head swap to a complex scenic display base with confidence!






