Español

How to Make Battle Craters for Wargames
- 10/17/2026 10:04:16
- Home , Assembly and Painting Guides
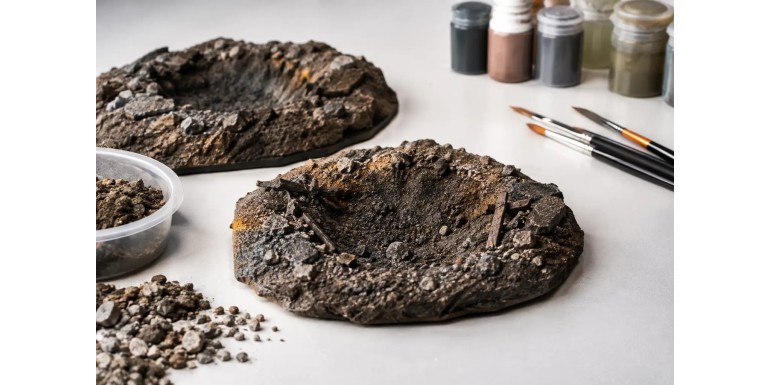
A good crater changes the flow and look of a gaming table in seconds. Where there was once an ordinary, featureless plain, you suddenly get an artillery impact, the drop point of an orbital pod, or the trace of a firefight that hasn't ended yet. Knowing how to create battle craters allows you to add cover, break lines of sight, and give a more believable scale to sci-fi, historical, dark fantasy, or post-apocalyptic games.
You don't need to build complex terrain for them to work. In fact, the most useful craters are usually standalone, durable, and low-profile pieces—capable of fitting onto the table without getting in the way of miniature movement. The key lies in controlling three things: the shape of the impact, the texture of the terrain, and a paint job that clearly distinguishes displaced soil, exposed rock, and scorched debris.
Before Creating Battle Craters: Decide Their Function
A display crater doesn't have the exact same needs as one built for weekly gaming. If it's going to be part of a diorama, you can exaggerate the rim, add twisted rebar, a destroyed miniature, or a patch of stagnant water. For a wargaming table, however, it's better to prioritize a low, easy-to-traverse silhouette. Miniatures' bases need to stand flat, and players must be able to quickly identify where cover begins and ends.
Scale matters too. In 28–32 mm, a crater between 10 and 18 cm (4–7 inches) in diameter works as a primary piece of scatter terrain. Smaller pieces (5 to 8 cm / 2–3 inches) help fill empty spaces and look especially good clustered around a larger blast center. In scales like 15 mm or 6 mm, reduce both the diameter and the rim thickness: a crater that is too deep can make vehicles and units look like toys stuck in a bowl.
Also, think about the type of ordnance or catastrophe you want to depict:
-
Explosive Shell: Leaves a raised rim of churned dirt and an irregular interior.
-
Energy Impact: Can vitrify the center and create deep, scorched zones.
-
Meteorite or Drop Pod: Features a cleaner, radiating, and deeper hole.
Deciding this beforehand keeps your texture and color choices from looking random.
Materials That Deliver Great Results
-
Base Material: The most practical bases are foam board, thin MDF, rigid plastic, or a sheet of styrene/PVC. Thick cardboard works for quick prototypes, but it can warp when applying PVA glue, putty, or paint. For gaming pieces, a rigid base significantly extends the terrain’s lifespan.
-
Building the Rim: You can use crushed cork, extruded polystyrene (XPS) foam, modeling putty, air-dry clay, or a mix of PVA glue and sand. Cork works exceptionally well because its rough fracture naturally suggests rock and compacted earth. Putty gives you control over smoother shapes, while XPS foam is ideal for large, lightweight craters.
-
Texture Needs Variety: Combine fine sand with small bits of cork, gravel, modeling ballast, and well-dried natural dirt. Don't use all grain sizes in equal proportions: sand should cover most of the surface, with larger elements appearing sparingly. This irregularity is what makes the ground look churned up by an impact rather than simply sprinkled with sawdust.
-
Finishing Touches: You'll need PVA glue (or terrain glue), primer, acrylic paints, old brushes, and pigments if you're aiming for a ultra-matte finish. A light drybrushing step will be especially useful for highlighting raised textures. At Terrain and Minis, you’ll find base materials, texture pastes, and environmental effects to tailor your results to deserts, urban ruins, trenches, or alien worlds.
How to Create Battle Craters Step-by-Step
1. Cut an Irregular Base and Mark the Center
Start by cutting an oval or circular shape, but avoid perfect contours. A real blast rarely leaves a flawless circle, and a slightly broken silhouette blends better with the rest of the board. Smooth the edges of the base with sandpaper or cover them with texture later so the piece doesn't look like a token slapped onto the table.
Mark the center of the crater and leave a relatively flat area. Even though the impact should suggest depth, you don't need to bore through the base. A visual depression created by the raised rim offers almost the exact same effect while keeping the piece stable. Furthermore, it lets you place miniatures inside without tipping them over.
2. Build the Ring of Displaced Earth
Glue fragments of cork or apply putty around the center to form an uneven ring. Instead of raising the rim uniformly, concentrate more volume in two or three spots—as if the explosion threw dirt outwards in specific directions. Leave some parts low or open so miniatures can enter the crater without the piece acting like an impassable wall.
Work on smooth transitions: the interior should slope down toward the center, while the outer rim should taper gradually down to the base. A harsh step will make the crater look artificial and prevent miniatures with larger bases from standing flat. Use putty or a thick mix of glue and sand to blend these joins smoothly.
3. Add Texture with a Clear Hierarchy
Coat the base with diluted PVA glue and sprinkle fine sand over it. Before it dries, add a few stones, cork bits, or rubble near the rim and along the raised earth ring. Place the larger elements radiating outward from the center to emphasize the direction of the blast.
Don't crowd the entire interior with rocks. A partially cleared center helps define visual depth and leaves room for a miniature, an objective marker, or a wrecked vehicle.
-
Urban Craters: Replace part of the gravel with crushed brick, plastic scrap, broken beams, or wall debris.
-
Alien Worlds: Try coarser textures, crystals, or singed alien flora.
Once the glue is dry, check for loose grains. Shake off any excess and apply a sealing layer of diluted PVA glue (or a mod podge/water mix) over the entire textured surface. This sealing step is crucial for frequently handled terrain—it prevents sand from shedding during storage or when rubbed against bases and dice.
Painting: Depth Without Overcomplicating the Process
1. Priming: Prime the crater in black, dark brown, or gray depending on your gaming table. A black base makes it easy to achieve a scorched or urban finish; a brown base is faster for natural earth. If your texture material is very absorbent, apply thin coats of primer to avoid clogging fine details.
2. Basecoating the Interior: Paint the center with your darkest tone.
* Temperate earth: Very dark brown mixed with black.
* Ash/Rubble: Charcoal gray.
* Energy impact: Black with subtle blue or purple undertones. As you move outward toward the rim, transition to mid-browns, ochres, beige, or grays. This gradient creates the illusion of depth even if the physical piece is relatively flat.
3. Drybrushing: Reserve drybrushing for raised areas. First, apply a mid-tone over the rocks and rim, followed by a lighter shade in smaller amounts. A common mistake is using too much beige or white: while it highlights the relief, it can make the piece look uniformly dusty. It is better to build up soft passes of drybrushing gradually than to overload your brush in one go.
4. Final FX: For a recent blast, apply heavily diluted black wash/ink to the center and add radial streaks extending outward. You can enhance the effect with dark pigments carefully fixed in place. For wet mud, applying gloss varnish exclusively to the lowest points creates convincing puddles. On a desert board, ochre pigments and minimal dried tufts will integrate the crater far better than soot effects.
Details That Tell a Battlefield Story
The best details aren't necessarily the most numerous. A scrap of armor plating, a broken wheel, an abandoned weapon, or a piece of shattered signage can instantly anchor the crater to a specific conflict. Keep scale in mind: a piece of rubble that is too large can turn a mortar crater into a quarry.
Consistency with your gaming board is also key:
-
If your table features reddish soil, use the same base color palette on your craters.
-
If you use static grass, add small tufts along the outer edges—never in the freshly blasted center.
-
If the board represents industrial ruins, mix in gray dust, brick, and rusted metal.
The piece should stand out as a tactical terrain feature, not look like an object imported from a completely different game.
Conclusion
For tabletop games, prepare several craters of varying sizes and reuse key materials across them without repeating identical shapes. A set of three small pieces alongside a large one suggests an artillery barrage and offers far more tactical options than a single isolated piece. Store your craters with paper or foam dividers if they feature fragile details, especially static grass, wire, or machinery bits.
A well-crafted battle crater doesn't need to be overly flashy on its own. It just needs to look believable when a squad digs in along its rim, when an armored vehicle rolls past, or when the table lighting highlights its texture. If it serves that purpose, it’s doing its job: making every match tell a unique battle story.