
 Español

How to Avoid Resin Bubbles in Miniatures & Terrain (Complete Guide)
- 09/12/2026 09:49:40
- Home , Assembly and Painting Guides
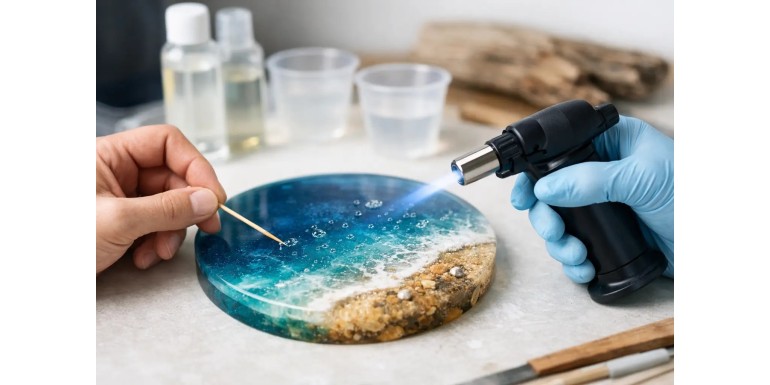
A body of water covered in trapped bubbles can ruin an otherwise magnificent display base. Similarly, a clear canopy or crystal-clear dome over a miniature loses its magic if it looks dusty and cloudy. Knowing how to avoid resin bubbles isn't about relying on a single trick with a lighter—it starts when you choose your product and ends only when the piece has fully cured. In miniature painting, terrain making, and diorama building, every step counts.
The good news is that most resin bubbles are entirely preventable. The few that appear during pouring can easily be removed if you work patiently and use the right tools. The key is understanding where they come from: air introduced during mixing, resin that is too cold or viscous, humidity, porous surfaces, or an uncontrolled curing reaction.
1. Choose the Right Resin for Your Pour Thickness
Not all clear resins are formulated for the same jobs. For a shallow water effect on a terrain piece, a coating resin or a low-depth pouring resin works best. For a deep river bed, a terrain capsule, or a thick casting, you need a resin specifically formulated for deep pours (deep cast resin).
Forcing a thin-coat resin into a deep pour raises the temperature of the exothermic reaction. This leads to unwanted air bubbles, yellowing, cracking, or even warping nearby plastic miniatures. On the flip side, deep-pour resins take much longer to cure if applied in ultra-thin layers. Always check the manufacturer's maximum pour depth and working time (pot life).
The type of project also dictates your approach:
-
Swamp water: A slightly tinted layer with surface texture can easily hide minor imperfections.
-
Crystal-clear canopies, glass windows, or pristine ocean water: Any tiny bubble will be completely visible.
The clearer the finished piece needs to be, the more meticulous your preparation must be.
2. Prepare Your Workspace Before Opening the Bottles
Temperature is one of the most overlooked factors when working with epoxy resin. Cold resin becomes thick and viscous, trapping air much more easily. Whenever possible, work in a stable, warm room (ideally around 20–25°C / 68–77°F). Avoid freezing garages, drafty tables near open windows, or areas with extreme temperature fluctuations during the curing process.
If your resin bottles are cold to the touch, submerge the sealed bottles in a warm water bath for a few minutes. Do not use boiling water or place them directly on a radiator—overheating accelerates the chemical reaction and drastically reduces your working time.
Be sure to dry the bottles completely before opening them. A single drop of water in your epoxy mix can cause curing failures, sticky spots, and a cloudy, milky haze.
Controlling Ambient Humidity
Ambient humidity requires equal attention. On high-humidity days, some resins develop a tacky or cloudy surface film (amine blush). While you can't control the weather, avoid working while it's raining or placing fans directly over your workspace. Covering your curing piece with a clean plastic box protects it from dust, stray hairs, and static grass fibers.
3. How to Avoid Bubbles While Mixing Resin
Respect the Exact Mixing Ratio
Some resins are measured by volume, while others require precise measurement by weight—these methods are not interchangeable. Use clean graduated mixing cups or a digital scale as instructed by the manufacturer. Never alter the ratio in an attempt to make the resin thinner; doing so results in soft, sticky, or uncured spots.
Stir Slowly and Thoroughly
The most common mistake is whipping the resin like paint. Fast movements incorporate air and fill the cup with micro-bubbles. Instead, drag your mixing stick slowly and steadily along the bottom and sides of the cup. Stir for the recommended duration (usually 3–5 minutes), scraping the walls frequently.
The Two-Cup Mixing Method
A highly reliable technique for bubble-free epoxy is the double-potting method:
1. Mix your epoxy and hardener thoroughly in the first cup.
2. Pour the entire contents into a second clean cup.
3. Stir gently once more using a clean stick.
This ensures no unmixed, raw hardener from the sides of the first cup ends up on your project, preventing incomplete cures on display bases and water effects.
Once mixed, let the resin sit for 1 to 2 minutes (if the pot life allows). This gives larger bubbles time to rise to the surface naturally. Do not wait so long that the mixture begins to heat up or thicken, as thicker resin makes it harder for bubbles to escape.
4. Seal Porous Surfaces and Prep Your Molds
Materials like cork, balsa wood, texture paste, plaster, 3D printing resins, and natural rocks contain trapped air. When covered with liquid resin, this air slowly escapes, creating bubbles from underneath. This is why a water effect can look perfect initially, only to show tiny craters 30 minutes later.
Always pre-seal your terrain with a thin coat of varnish, PVA glue, or a compatible sealing medium, and let it dry completely. Pay special attention to riverbanks, miniature tree trunks, sand, and crevices between rocks. Alternatively, applying a very thin "seal coat" of resin works well before pouring the main layer.
If you are using silicone molds, ensure they are clean, dry, and free of mold-release residue. When encapsulating miniatures, dried vegetation, or 3D prints, verify that all paints and adhesives are fully cured, as some chemicals off-gas and react with epoxy.
5. Pour in Thin, Controlled Layers
Never dump the entire batch of resin all at once into the center of your project. Pour slowly from a low height in a long, thin stream. A thin stream helps pop bubbles as the resin falls. For scenery channels or ponds, start at the lowest point and guide the liquid smoothly with a clean spatula.
Pouring in thin layers gives you far more control. Wait for the recommended gel time before adding the next layer. For terrain projects, applying two or three thinner layers often yields better results than a single deep pour: it allows you to eliminate bubbles stage-by-stage, tint different depths, and embed details like aquatic plants, fish, or water foam between layers.
Note: Be mindful of re-pour times. If a layer cures completely before the next pour, a visible seam line may form. Lightly sanding the surface between cured layers helps ensure strong mechanical adhesion.
6. Eliminate Visible Surface Bubbles with Controlled Heat
After pouring, monitor the surface during the first few minutes:
-
Large bubbles: Remove them manually using a toothpick, needle, or the tip of a hobby knife.
-
Surface micro-bubbles: Pop them effortlessly with a brief pass of gentle heat or a torch flame.
Heat must be applied sparingly and kept in constant motion. A heat gun on a low setting works well for large terrain boards, but keep it at a distance—excessive heat can scorch the resin, drag pigments around, or trigger flash curing. A butane torch or lighter also works for surface bubbles, but never hold the flame in one place or bring it near flammable materials like XPS foam, static grass, or dry foliage.
For small display bases, a quick inspection with a sewing needle is usually all you need. You don't always need heat; if your resin is warm, properly mixed, and poured onto a sealed surface, most bubbles will pop on their own.
7. Troubleshooting: Why Did Bubbles Appear Later?
-
Bubbles rising from the bottom: Indicates porous terrain or unsealed material.
-
Bubbles suspended throughout the entire layer: Caused by aggressive stirring or working with cold resin.
-
Irregular curing and bubbles hours later: Check for improper mixing ratios, cold room temperatures, or expired resin.
How to Fix Deep Resin Bubbles
Never attempt to fix soft, semi-cured resin by pouring another layer on top. Allow the piece to cure completely first.
-
For surface dimples/craters: Sand the surface lightly and apply a thin topcoat to self-level.
-
For deep, trapped bubbles: The cleanest fix is to sand or drill down into the bubble, clean out the debris, and re-pour clear resin into the cavity in controlled layers.
Final Thoughts
At Terrain and Minis, we treat water effects and clear resin work as an integral phase of the build—not an afterthought. Prepare your base, control your workspace environment, and pour in layers. The next time you create a flowing river, an urban puddle, or a sci-fi display capsule, let patience do the work that no lighter or flame can fix!






