Español

The Ultimate Guide to Assembling Multipart Miniatures
- 09/19/2026 08:21:53
- Home , Assembly and Painting Guides
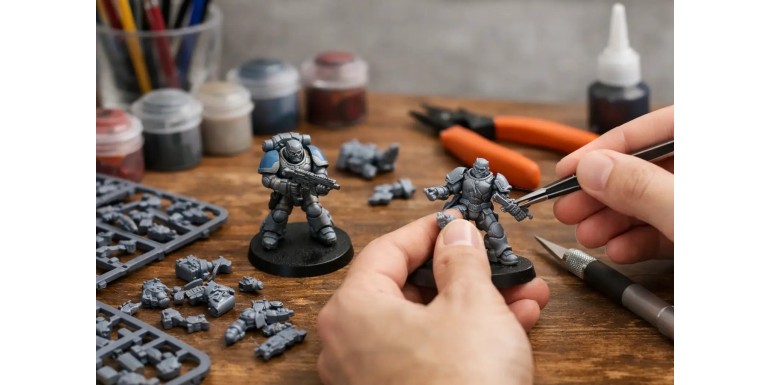
A twisted power sword, a visible shoulder pad seam, or a model that snaps off its base during its very first trip to the gaming club can ruin a great hobby project before a paintbrush even touches it. This multipart miniature assembly guide is designed to prevent those issues right at your workbench—helping you identify individual bits, prepare joint seams, and select the proper adhesive so your models are clean, structural, and tabletop-ready.
Multipart miniature kits offer far more dynamic poses, weapon loadouts, and personality than single-piece figures. In return, they demand a methodical approach. Different materials behave differently: high-impact plastic, resin, and white metal require unique tools and adhesives, and a join that looks seamless during a quick dry fit might reveal a gaping void once glue is applied.
1. Before You Glue: Inspect Sprues, Instructions & Materials
The assembly process starts before you clip the first piece free. Carefully examine the plastic sprues or component bags, cross-reference the assembly instructions, and distinguish optional cosmetic options from mandatory structural pieces. For complex kits with dozens of heads, weapons, and accessories, group your components into subunits so you don’t mix up parts across different models.
The Dry Fit Test
Always perform a dry fit test without adhesive for core sections: legs to torso, arms to weapons, backpacks, heads, and display bases. Dry fitting allows you to verify physical fit, establish a logical assembly sequence, and identify hard-to-reach areas that will be obscured later. For models featuring two-handed weapons or crossed arms, this step prevents the classic mistake of gluing one shoulder into place only to realize the second hand no longer aligns with the weapon grip.
Essential Miniature Modeling Tools
To build comfortably, you need a few high-quality modeling tools kept in good working order:
-
Flush-Cut Sprue Cutters: To clip bits cleanly without gouging surrounding detail.
-
Hobby Knife / Scalpel: Equipped with a sharp blade to trim mold lines, flash, and sprue gates.
-
Fine Needle Files / Sanding Sticks: To level uneven joint surfaces smoothly.
-
Adhesives: Plastic cement, cyanoacrylate (super glue), and modeling epoxy putty matched to your kit material.
-
Tweezers & Precision Applicators: To place tiny bits and apply adhesive with total control.
Good workspace lighting is just as critical. A bright desk lamp reveals mold lines, flash, and micro-gaps before they turn into glaring defects under a coat of primer. If you assemble multiple squad members at once, keep clipped components organized in small trays or hobby sorting boxes to avoid lost bits.
2. Preparing Bits: The Final Finish Is Decided Here
When clipping parts off plastic sprues, leave a tiny nub of excess plastic between the cutter jaw and the miniature piece. Avoid cutting flush against delicate details like cape hems, rifle barrels, or fingers. The remaining stub is far more safely shaved away using short, controlled passes with a sharp hobby knife.
Removing Mold Lines
Scrape away raised mold lines carefully. You don't need to gouge the surface: tilt your knife blade at a 90-degree angle and pull the spine backward across the seam, or use a fine needle file to restore the original geometry. Left untreated on flat armor plates, helmets, or vehicle hulls, ignored mold lines will become twice as visible once primed.
Material-Specific Prep Work
-
Resin Kits: Resin parts often carry residual mold release agent that repels spray primers and super glue. Wash resin bits in warm, soapy water, scrub gently with a soft toothbrush, and let them air-dry completely. If a resin sword or banner is slightly warped, submerge it in hot water for a few seconds to reshape it safely.
-
Metal Miniatures: File away casting flash and lightly score smooth joint faces with your blade point. Creating a micro-textured grid pattern gives super glue significantly more surface area to grip.
3. Choosing the Right Glue for Miniature Assembly
Select your adhesive based on the physical material and joint load, not out of habit:
| Adhesive Type | Compatible Materials | Key Benefits | Best Used For |
| Plastic Cement (Liquid Poly) | Hard Polystyrene Plastic | Welds plastic together permanently. High structural strength. | Plastic infantry, vehicle hulls, armor seams. |
| Cyanoacrylate (Super Glue) | Resin, Metal, 3D Prints, Mixed Bits | Sets fast; holds disparate materials together. | Resin figures, pewter models, metal-to-plastic joins. |
| Two-Part Epoxy Putty | All Materials | Fills wide structural gaps; can be sculpted. | Filling deep torso voids, building scenic base joins. |
Plastic Cement vs. Super Glue
Plastic cement works by chemically melting polystyrene surfaces together, creating a cold-weld bond as it cures. Apply it sparingly to only one side of the joint; excessive cement can squeeze out, melting nearby surface rivets or leaving glossy chemical scars.
Super glue is essential for resin and metal, but it offers zero gap-filling capacity and can prove brittle against lateral drops. A microscopic bead is often all you need—applying excessive super glue only slows curing times and risks fogging surrounding detail.
Gap Filling and Pinning Heavy Components
When two components leave a visible seam, do not stack liquid glue to bridge the void. Use modeling putty (such as Green Stuff, Milliput, or liquid acrylic putty) to level joints smoothly.
For heavy pewter parts, large wings, or resin monsters, pinning is required:
1. Drill a small pilot hole into both mating surfaces using a hand pin vise.
2. Insert a short length of brass wire or a metal paperclip.
3. Secure the pin with super glue before joining the two halves.
Pinning takes extra time, but it ensures banners, high-value characters, and large monster kits survive repeated transit in foam carrying cases.
4. Assembly Sequence: Planning Ahead for Painting
Start with the model’s core structural framework: legs, torso, and any flowing robes or loincloths. Once the core stance is set, test-fit the arms, weapons, and head multiple times before committing glue. Your goal is a natural silhouette where the weapon points realistically down its line of sight.
For figures with two-handed weapons:
1. Glue one hand to the weapon grip first.
2. Align the whole arm-and-gun subassembly against the torso sockets while the glue sets.
3. Adjust the opposite shoulder angle to prevent floating wrists or awkward arm tension.
Sub-Assemblies for Detailed Painting
You don't always need to assemble a miniature 100% before priming. Sub-assemblies are invaluable whenever a bit blocks brush access to high-detail areas—like a heavy shield held across a chest, a rifle crossing a detailed tunic, or a rider inside an open vehicle cockpit.
Keep sub-assemblies minimal: too many loose parts complicate priming and handling. A great rule of thumb is:
-
Tabletop Army Troops: Assemble fully before painting for maximum structural durability and speed.
-
Display Models & Centerpiece Characters: Plan smart sub-assemblies. Mount loose heads or arms onto temporary painting handles using poster tack or a tiny dot of super glue.
5. Seamless Finishing and Base Preparation
Before setting the figure aside to cure completely, inspect it from all viewing angles. Look for gaps around shoulder sockets, neck collars, waists, and where feet meet the display base. While a hair-thin line disappears under primer, a deep void will remain visible through multiple paint coats.
Apply small amounts of putty and smooth it flat using a wet silicone clay shaper or metal sculpting tool. On organic textures like fur, skin, or muscle, mirror the surrounding flow. On sharp armor plating, keep edges crisp and defined.
Ensure both feet seat flush on the display base so the figure doesn't lean awkwardly. If you plan to build custom base terrain using cork, rocks, or texture pastes, determine your final terrain height beforehand so the miniature doesn't look like it is floating over the ground.
Common Miniature Assembly Mistakes to Avoid
-
Rushing Without Dry Fitting: Skipping dry fits leads to misaligned arms, misjudged weapon angles, and ruined seams.
-
Using Too Much Glue: Squeezing excess plastic glue or super glue onto a joint destroys fine surface details and creates messy clean-ups.
-
Gluing Over Uncleaned Sprue Gates: Leaving tiny sprue nubs on contact faces creates unwanted gaps between mating pieces.
-
Ignoring Symmetric Bit Orientation: Left and right shoulder pads, knee guards, and arm sockets often feature subtle directional angles. Check your instruction manual before gluing.
When assembling large army boxes, work in batch stages: clean all legs and torsos, build the lower bodies, let them cure, then move on to arms and weapons. Batching creates visual consistency across the unit while reducing time wasted switching back and forth between tools.
A well-assembled multipart miniature shouldn't draw attention to its construction—it should disappear beneath primer, paint, and terrain, allowing the pose, loadout, and character of the model to take center stage!