
 Español

Guide to acrylic textures for bases and terrain
- 07/17/2026 09:35:19
- Home , Assembly and Painting Guides
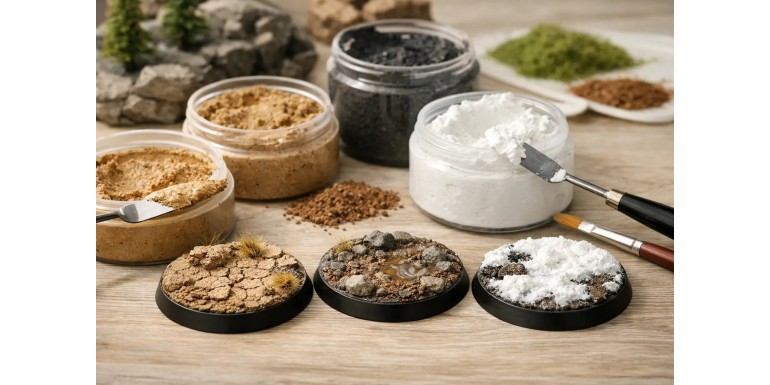
A poorly chosen texture on a miniature base can ruin the scale of an excellent model. A grain that is too coarse looks like a pile of random boulders, a completely flat surface tells no story, and haphazardly applied paste climbs up boots, hooves, and scenery. This guide to acrylic textureshelps you choose and work with pastes to create realistic terrain for miniatures, units, and gaming tables without overcomplicating the process.
What Acrylic Textures Bring to the Table
Acrylic textures are pastes made from acrylic binder mixed with mineral filler, sand, pigments, or fibers. You apply them directly using an old brush, a spatula, or a modeling tool. Once dry, they leave a textured surface with realistic volume. Their main advantage over gluing loose sand is control: the mixture stays put, requires no white glue undercoat, and lets you build terrain in fewer steps.
They do not replace all basing materials. For a large rock, a piece of cork, resin, or putty usually looks more convincing. For tall grass, roots, or industrial debris, it is best to add those specific details afterward. Texture paste works especially well as a base that unifies these different elements, eliminating that "glued-on" look.
There is also a practical difference between a display piece and a gaming unit. On a single model, you can work on complex transitions and fine details. For a 40-miniature army, the priority is to repeat the process quickly, maintain visual consistency, and avoid creating a layer so thick that it gets in the way of movement trays or carrying cases.
Choosing the Right Grain Size
The grain size determines your final result much more than the color of the paste. While the base tone helps guide your painting, you can easily change it with washes, drybrushing, and pigments. On the other hand, oversized gravel will always look like oversized gravel, no matter how well you paint it.
Fine Texture: Dirt, Ash, and Paths
Fine pastes are the most versatile option for 28mm to 35mm scales. They work perfectly for dry dirt paths, churned earth, volcanic ash, worn urban plazas, and ruin bases. To the naked eye, they suggest texture without distracting from the miniature.
Applied in a thin layer, they let you leave relatively flat areas near the model's feet while building up slightly more material around the edges. This variation prevents your base from looking like a uniform sand cookie. They also serve as an excellent foundation for adding small tufts, rocks, or pigments later.
Medium Texture: Broken Ground and Natural Terrain
Medium grain fits mountain trails, stony soil, dry mud, and scarred battlefields. It has enough presence to be visible from a distance on the gaming table, but requires moderation on smaller miniatures. On tight bases, use it sparingly: a small strip of path, an eroded patch, or around the base of a rock.
If your terrain features 28mm buildings, applying a medium texture to streets and courtyards adds realistic scale without requiring you to sculpt every single cobblestone. This is especially useful for gaming tables built to withstand frequent play rather than museum-display dioramas.
Coarse Texture: Gravel and Key Features
Coarse texture has a more specific role. Save its larger particles for embankments, rubble, roadsides, steep slopes, or rock piles. On a single base, a small patch is enough to convey rugged terrain.
A common mistake is covering the entire surface. This makes the particles look disproportionately large, like boulders. Mixing coarse paste in specific spots with fine texture around them creates a much more natural transition and preserves the scale of your model.
Special Pastes: Mud, Snow, and Technical Surfaces
Mud pastes usually dry to a wet or satin finish. They are perfect for trenches, wheels, boots, and rainy roads, but their shine must match the setting. A desert army with glossy mud on every base looks out of place unless the scene specifically justifies it.
Snow textures add volume and brightness, but they require uneven application. Let some of the ground show underneath and pile the snow where it would naturally gather: next to rocks, under vegetation, in cracks, and in sheltered spots. For industrial rooftops, metal walkways, or damaged concrete, a fine paste mixed with tiny debris and grey tones usually works better than standard earth textures.
Preparation Before Applying the Paste
Texture adheres best to a clean, dry surface. If you are using a smooth plastic base, a quick coat of primer or a light sanding improves grip. For MDF, foam board, or foam terrain, seal porous areas before applying wet layers to prevent warping.
Plan ahead for any elements that should stand out: rocks, planks, ruined walls, skulls, barricades, or resin bits. Glue them down first and let them dry. Then, apply the texture right up to their bases to integrate them. If you apply the paste first and glue the piece on top, you will end up with unnatural, clean seams.
Keep four tools handy:
-
A small spatula for spreading.
-
An old brush to push material into corners.
-
A toothpick to clean up excesses.
-
A silicone brush to smooth out edges.
You do not need to use all of them for every project, but they help you control the paste without ruining your painting brushes.
How to Apply Textures Without Covering Details
Load a small amount onto your tool and apply it starting from the center outward to the edge. On bases, leave a small margin near the rim if you plan to paint it a solid color. A clean rim is crucial for a cohesive army; even great-looking texture loses its impact if the sides of the base are messy.
Work in sections. Spread a thin base coat first, and before it dries, add extra paste only where you want more height. Press the spatula down and lift it gently to create cracked earth; drag a damp brush to add direction to mud or sand. On paths, make sure footprints or tire tracks follow a logical route instead of being scattered randomly.
Protect the model's feet if it is already glued and painted. You can apply the paste with a small brush, immediately clear away mistakes with a damp toothpick, and leave the area under the feet for last. However, for the cleanest results, it is usually more efficient to texture the base before attaching the miniature or before painting its final details.
Drying time depends on the thickness, humidity, and the paste's formula. A thin layer dries quickly, but deep build-ups need more time. Do not speed up the process with intense heat, as plastic bases or foam can warp, and the surface might dry and skin over while the inside remains wet.
Painting and Finishing Realistic Terrain
Many pastes come pre-colored, but you should rarely leave them as-is. A base coat helps unify different areas and ensures the terrain complements the model's color scheme. For temperate soil, start with a medium brown, darken the recesses with a wash, and highlight the raised areas with sand tones. For ash or urban ruins, use muted greys with warm or cool variations.
Drybrushing is still highly effective on textured surfaces, provided you wipe almost all the paint off your brush. Too much paint will turn every grain into a harsh white dot and flatten the texture visually. Apply multiple light passes, gradually building up brightness on the high points.
Pigments provide an excellent finish for dry environments, dusty roads, and ruins. Apply them at the very end, concentrating them in recesses and around the feet where dust would naturally collect. Using pigment fixer can slightly alter the color, so test it on a spare base first. For fresh mud or puddles, the contrast between matte texture and glossy effects adds depth, but keep the gloss localized.
Vegetation and small accessories should complete the story, not hide the surface. Two or three well-placed tufts on a base can suggest moisture, neglect, or a specific season. An indiscriminate mix of static grass, tufts, flowers, rocks, leaves, and snow usually ends up looking like a materials catalog.
Common Mistakes in Basing and Terrain
The first mistake is focusing on detail without considering scale. Before covering a base, compare the particle size to the model's boots, helmet, or a nearby doorway. The second mistake is repeating the exact same pattern on every miniature. Army cohesion does not require clones: vary the placement of a rock, the amount of grass, or the position of the broken ground.
You should also avoid harsh transitions. If a rock juts straight out of a flat layer of texture, it looks obviously glued on. Surround its base with fine paste, add a few tiny pebbles, and paint a contact shadow. On larger terrain pieces, apply this same concept between roads, grass, walls, and buildings to make the table look like a cohesive, lived-in space rather than separate pieces thrown together.
Finally, do not mix products without testing them first. Some pastes can be thinned with water to adjust consistency, while others lose their body, crack, or separate their pigment if diluted too much. A piece of scrap plastic, a spare base, or a hidden part of a terrain piece will let you test adhesion, drying time, and color before committing to a whole unit.
Good texture does not need to draw attention to itself. Instead, it should make the miniature feel like it is in a specific place: marching down a dusty road, defending a damp ruin, or crossing freshly fallen snow. Start with a test base, note the combination that works, and repeat it with minor variations across the rest of your project.






