Español

Wrinkle-Free Miniature Decal Guide: How to Apply Waterslide Decals
- 09/21/2026 19:04:48
- Home , Assembly and Painting Guides
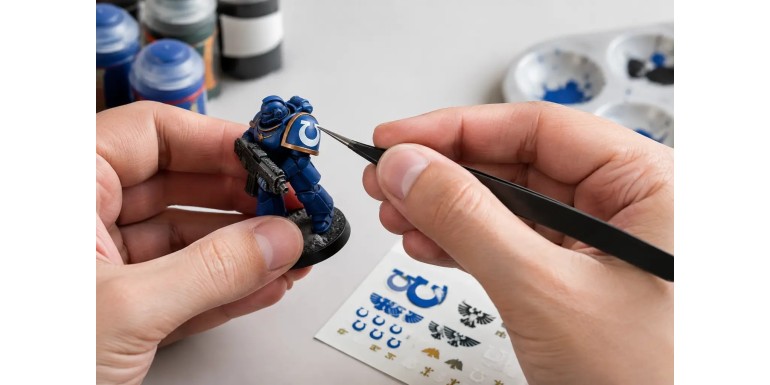
A crooked chapter badge on a Space Marine's pauldrons, a decal silvering over tank armor, or a fragile emblem tearing the moment you touch it can ruin an otherwise stunning paint job. This wrinkle-free miniature decal guide focuses on preventing those frustrating mishaps using a straightforward process, the right modeling products, and a little bit of patience. When applied correctly, waterslide decals offer a level of razor-sharp precision that is difficult to achieve with freehand painting—especially for heraldry, vehicle registration numbers, tactical markings, and panel iconography.
Decals are not a replacement for painting, nor are they an automatic shortcut. They look best when fully integrated into the miniature's overall finish: placed over a smooth surface, protected with a protective seal, and chemically softened to drape naturally over raised contours. The final result should look as if the emblem was painted directly onto the miniature, not stuck on top of it.
1. What Are Waterslide Decals & When Should You Use Them?
Waterslide decals (often called transfers) are high-resolution designs printed on an ultra-thin carrier film. When submerged in water, the film releases from its paper backing, allowing you to slide the emblem onto your miniature. They are standard inclusions in sci-fi army boxes, historical military kits, aviation models, mechas, and squad-based wargames with repeating iconography.
Key Advantages
-
Consistency: They allow you to reproduce an identical insignia across an entire unit, giving your army visual cohesion.
-
Speed & Accuracy: They save immense time on fine details that demand a steady hand—such as tiny squad numerals, eye optics, complex heraldic shields, or technical warnings.
-
Uniformity: Across a 10-man squad, a decal sheet prevents your emblems from varying in size or shape.
Use decals whenever a design is too intricate to paint cleanly by hand or when strict squad uniformity is required. Conversely, if you want an ultra-rustic, hand-painted, or heavily weathered look, freehanding, stenciling, or combining techniques may be better choices.
Pro Tip: A decal can serve as a perfect foundation! Apply the waterslide transfer first, then edge-highlight or battle-damage the motif using acrylic paints to blend it into your custom scheme.
2. Essential Tools & Products for Applying Decals
You don't need an elaborate workstation, but clean, dedicated tools are essential:
-
Shallow Dish with Warm Water: To loosen the transfer film smoothly.
-
Precision Tweezers & Fine Soft Brush: A brush is much safer than tweezers for moving a wet decal, drastically reducing the risk of tearing or folding the film.
-
Absorbent Paper / Cotton Swabs: To wick away excess water.
-
Precision Hobby Knife / Scissors: To trim excess carrier film close to the design.
-
Varnishes: Gloss varnish for preparation, plus Matte or Satin varnish for sealing.
-
Decal Solutions (Setter & Softener):
-
Decal Setter: Enhances surface adhesion and aids initial positioning.
-
Decal Softener: Chemically softens the carrier film, allowing it to conform around rivets, panel lines, rounded pauldrons, and complex contours.
-
Note: Different decal sheets react differently to chemical softeners. Ultra-thin transfers can melt if treated with overly aggressive solutions. If working with a rare or out-of-print transfer sheet, test your setting solutions on a spare emblem first.
3. Step-by-Step Guide to Applying Miniature Decals
Step 1: Prepare a Smooth Surface (Stop Silvering Before It Happens)
Most decal issues—especially silvering—start long before you touch the transfer sheet. Silvering occurs when micro-bubbles of air get trapped underneath the transparent film, creating a cloudy, greyish glare around the design. Matte acrylic paint has a microscopic texture that traps air pockets easily.
1. Apply a thin coat of gloss varnish over the target area.
2. Allow it to cure completely.
The glossy coat creates a glass-smooth surface that eliminates air pockets, improves adhesion, and hides the transparent edges of the film.
+-------------------------------------------------------+
|  [Decal Film]                                         |
|  ===================================================  | <- Smooth Gloss Varnish (No Air Pockets)
|  ###################################################  | <- Acrylic Base Coat / Miniature
+-------------------------------------------------------+
-
Trim the decal as close to the printed design as possible using a sharp blade. The less clear film surrounding the icon, the less visible edge you will need to conceal later.
Step 2: Moisten and Place the Transfer
Submerge your trimmed decal in warm water for 5 to 10 seconds, then place it on a clean work surface. Wait until the decal slides easily across the paper backing. Do not leave decals submerged for minutes, as the adhesive will wash away and the film will become brittle.
While waiting, moisten the target area on your miniature with a drop of decal setting solution or clean water. Slide the edge of the decal off its paper backing directly onto the model, pulling the paper away smoothly.
Position the emblem using a damp, soft paintbrush. Check alignment from your normal gaming perspective as well as up close. On curved surfaces like Space Marine shoulder pads, an emblem that looks centered from the front might sit tilted when viewed from above.
Step 3: Remove Excess Moisture & Conform to Curves
Once positioned, gently dab excess water away by touching the edge of the decal with absorbent paper or a dry brush. Never drag paper across a wet decal, as lateral friction will tear or shift the film.
-
Flat Surfaces: Allow the decal to dry naturally.
-
Curved or Textured Surfaces: Brush a moderate coat of decal softening solution over the transfer.
During this stage, the decal may wrinkle slightly. Do not touch it! It is completely normal for softened decals to look distorted before they shrink-wrap tightly around rivets, curves, and recessed panel lines.
If a decal needs to sink into deep armor grooves, apply a second light coat of softener after the first has dried. For extreme geometries, like spherical shoulder armor, make microscopic relief cuts along the outer clear edges of the film using a fresh scalpel before dipping it in water.
4. Sealing & Blending the Decal for Tabletop Play
A dried decal is not a finished decal. Sealing protects the film from gaming wear, prevents peeling, and unifies the sheen with your surrounding paintwork.
1. Intermediate Seal: Apply a thin coat of gloss or satin varnish over the dried decal if a faint carrier border is still visible.
2. Final Coat: Apply your choice of protective varnish across the whole area:
-
-
Matte Varnish: Ideal for cloth, infantry, and grimdark armor.
-
Satin Varnish: Excellent for power armor, vehicles, or punchy sci-fi schemes where pure matte might dull rich colors.
-
Gloss Varnish: Reserved for display lenses, targeting screens, or wet surfaces.
-
Weathering Decals Like a Pro
To completely erase the "sticker look," treat the decal as an integrated part of the paint job:
-
Edge Chipping: Use a fine detail brush or a piece of blister foam to dapple dark brown or metallic paint across the emblem's edges.
-
Panel Line Washes: Run dark pin-washes or enamel grimes directly through any panel cuts bisecting the decal.
-
Dust & Pigments: Apply weathering powders over the lower edges of the transfer to match the ground texture of the base.
5. Troubleshooting Common Decal Mistakes
-
The Decal Tears During Application: Caused by working too fast, using dry tweezers, or using aged, brittle transfer sheets. For old sheets, brush a clear decal restorer/film restorer liquid over the sheet before cutting.
-
Trapped Air / Persistent Silvering: Prick the center of the silvered area with an ultra-fine sewing needle, apply a drop of decal softener, let it sink in, and seal with gloss varnish.
-
Visible Clear Borders: Usually solved by applying two thin, light coats of satin or matte varnish rather than one heavy, thick layer that risks obscuring fine surface details.
6. Decals on Vehicles, Bases & Scenery
Vehicles are the most rewarding targets for decals due to their large armor panels. However, large flat surfaces are unforgiving of sloppy placement. Always dry-fit your trimmed decal against the hull to confirm spacing and orientation before getting it wet.
On scenic bases and terrain, decals make fantastic industrial warning signs, hazard stripes, ancient runes, or street graffiti. Treat terrain decals with the same care: weather them heavily with weathering pigments, washes, and chipping so a pristine sign doesn't look out of place on a muddy, grimdark battlefield!
Shopping at Terrainandminis.com makes sourcing compatible varnishes, weathering pigments, acrylic paints, and scenic supplies effortless, ensuring every unit, vehicle, and terrain piece looks like it belongs to the exact same conflict.
A great decal application doesn't draw attention to itself—it draws attention to your miniature. Spending a few extra minutes preparing and sealing your transfers will transform standard sheets into realistic, professional army markings that hold up game after game!