
 Español

Miniature Rust Effects Done Right
- 07/07/2026 19:58:43
- Home , Assembly and Painting Guides
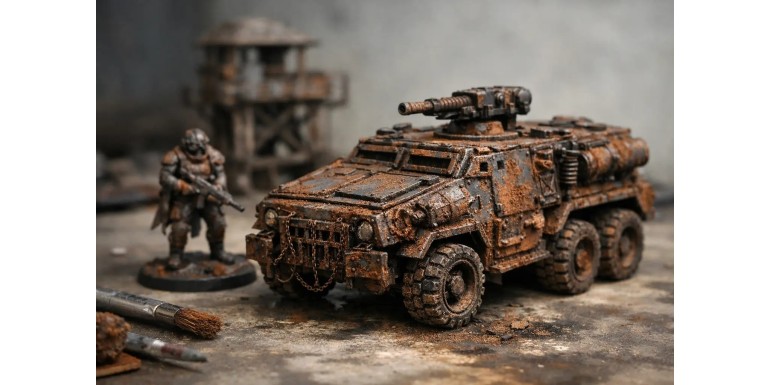
There is a very common moment in the hobby: a piece comes out clean, perfectly highlighted, with the correct highlights... and yet, it looks too new. That is precisely where miniature rust effects start to make a difference. Not because everything needs to look old, but because rust adds history, wear, and context to vehicles, armor, pipes, scrap metal, and scenery.
The most common mistake is treating rust as a color. It is not. It is a combination of texture, stains, past moisture, weathering, and accumulation in specific areas. When painted as if it were simply orange over metal, the result usually looks flat or exaggerated. When worked in layers and with logic, the piece gains a lot without the need to complicate the process.
What Makes a Miniature Rust Effect Believable
Rust does not appear the same everywhere. On a sword, it might be subtle and concentrated near the guard or in crevices. On an armored vehicle, it can break out around rivets, dents, welds, and edges where the paint has chipped. On industrial scenery, especially on grates, drums, or pipes, it allows for more intensity and contrast.
The key lies in first thinking about the material and the environment. A steel piece exposed to rain, mud, or salt spray does not age the same way as poorly maintained armor or machinery abandoned indoors. If you work through that logic before painting, placing the effect becomes almost second nature.
It is also useful to separate three states that are often mixed up: weathered dark metal, recent chipping, and developed rust. Weathered metal usually tends toward cold, grayish tones or very dark browns. Recent chipping reveals clean metal or primer. Developed rust ranges from dull reddish-browns to more vibrant oranges, but almost never in uniform blocks.
Miniature Rust Effects with Acrylic Paint
The most controllable way to start is with acrylics. It works well both for those taking their first steps and for those who want a consistent result across an entire unit. The first step is to start from a believable base. If the metal beneath the rust is going to show, it is best to start with a dull metallic or a mix of black, brown, and a touch of steel.
Next, it is convenient to create depth in the areas where rust will accumulate. Dark, reddish, and somewhat purplish browns work better than a simple, flat brown. Applied in recesses, joints, and rivets, they prepare the ground for warmer tones. From there, medium browns and desaturated oranges can be added in small touches, preferably with a sponge or an old brush rather than a smooth layer.
This is where you want to hold back. Bright orange draws a lot of attention, and that is why it is often overused. On most miniatures, the dominant rust tone should be dark brown or reddish, leaving orange for specific spots where corrosion is most active or recent. If the entire surface glows orange, it stops looking like rust and starts looking like decorative paint.
A good trick is to work in broken layers. First, irregular dark stains. Then, a few medium points. After that, just a few light touches. If they blend slightly into one another with very thin glazes, the effect gains naturalness. There is no need to cover much. In fact, when too much effort is visible, there is usually too much paint.
Where to Place Rust so It Does Not Look Random
Placement matters more than the recipe. Rust appears where water is retained, where friction breaks the paint, or where the material is left exposed. On miniatures and scenery, this usually translates to rivets, joints, the lower sections of panels, holes, cuts, rough surfaces, and damaged edges.
On vertical pieces, rust streaks (streaking grime) help a lot. A small accumulation under a bolt and a very subtle line running downward tell a story better than a large stain in the middle of a smooth plate. On weapons and armor, rust usually looks best near joints and less-handled parts, unless you are aiming for an extreme look of abandonment.
Texture, Pigments, and Weathering Products
When you want the rust to have a physical presence, not just color, texture comes into play. On industrial scenery, vehicles, robots, or mechanical remains, a slightly rough surface takes the effect to a whole new level. This can be achieved with fine textures, specific corrosion products, or even highly controlled applications of fixed pigment.
Pigment provides a matte, earthy quality that is hard to replicate with paint alone. It works great for finishing areas of dry corrosion, battered edges, or deposits accumulated on lower sections. The problem is that, if applied without control, it muddies the readability of the piece and kills contrast. That is why it works better as a localized finish rather than an all-in-one solution.
Weathering enamels and oils also have their place. They allow you to create filters, stains, and streaks with more working time, which is useful on large surfaces of vehicles or scenery. They are not always worth it on very small miniatures, where well-used acrylics are usually faster and sufficient. It depends heavily on the size of the piece and how far you want to push the realism.
When Is It Worth Adding Chipping?
Rust and chipping usually go hand in hand, but not always in the same proportion. If a painted surface has been damaged, it makes sense to show the lifted paint first and then the corrosion colonizing that spot. This looks especially good on tanks, metal doors, containers, and industrial panels.
Chipping works best if it has two levels: a dark one for depth and a metallic or lighter one on part of the edge to suggest volume. Afterwards, a touch of rust in the lower or inner part of the damage integrates everything. If you paint rust without prior damage in an area where the paint looks intact, it may be less believable.
Common Mistakes When Making Miniature Rust Effects
The first mistake is always using the same color scheme. Not all rust is orange. There is corrosion that is almost black, other areas that lean toward leather brown, and others that approach dusty tones. Varying within the same piece avoids that cookie-cutter finish that repeats from one miniature to another.
The second mistake is putting it everywhere. On the gaming table, drama is appreciated, yes, but every material and every faction asks for something different. A gang of scavengers, an abandoned factory, or a post-apocalyptic walker can take a lot of punishment. An elite army, ceremonial armor, or well-maintained machinery cannot.
The third is forgetting the context of the base or the board. If the miniature is stepping on clean snow, intense and dry rust might need a different interpretation. If it is in a port, a humid environment, or a factory, it fits much better. When the base, scenery, and miniature speak the same visual language, the result truly shows.
How to Adapt Rust According to the Piece
On small weapons, less is usually more. A brown wash, a couple of reddish dots, and some dull metal are enough. On armor, excessive rust can eat away at the readability of the main color scheme, so it is best to reserve it for joints, hardware, or damage.
On vehicles, the opposite happens: there is more surface area and more opportunities to tell a story of real wear and tear. That is where chipping, streaks, and accumulations on the lower parts work incredibly well. On scenery, especially industrial or sci-fi terrain, you can afford texture, pigment, and more aggressive contrasts because the piece needs to read well from a distance.
If you are working on batches of terrain elements, it pays to limit the rust palette to two or three base tones. This keeps everything consistent, so it does not look like every barrel came from a different universe. In a specialized store like Terrainandminis.com, where miniatures, scenery, textures, and finishing materials coexist, that coherence between pieces is usually what is most appreciated when setting up a complete table.
A Simple Method That Almost Always Works
If you want a practical formula to get started without getting lost, think of four steps: a metallic base or painted surface, damage or dark shading, rusts in browns and reds, and a finish with a light tone or pigment only on key points. This order prevents the effect from getting out of hand too early.
The important thing is to stop in time. Rust is one of those finishes that improves a piece in small doses and ruins it when you try to squeeze in one more step. Do one part, step away for a few minutes, and look at the miniature again from a gaming distance. If it already conveys use, abandonment, or harshness, it probably does not need anything else.
When the effect is well placed, it does not draw attention to itself. What it does is convince you that this miniature has been on a campaign, in a rusty spaceship, or in a real industrial ruin. And that, on the table or in a display case, is worth much more than any spectacular orange.






