
 Español

Best mud effects for miniatures
- 07/13/2026 10:31:51
- Home , Assembly and Painting Guides
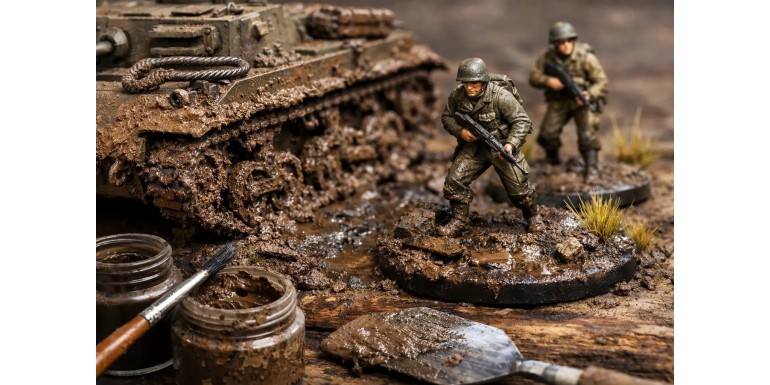
A miniature base with uniform dirt might be well-painted, but it rarely tells the story of where the miniature has been. A boot sunken next to a dry patch, splatters on a tank's lower hull, or mud built up under the wheels make the piece look like it's part of a battle, not just a figure placed on a stand. The best mud effects for miniatures combine texture, color, and logical placement—it’s not about covering everything in brown.
What Mud Effect Your Miniature Needs
Before choosing a product, define the terrain. Mud on an autumn road does not behave the same way as mud in a trench, a marsh, or a riverbank. It also changes depending on the scale: at 28-32mm, a grain that is too coarse can look like a boulder; on larger-scale vehicles, a very fine texture can disappear entirely.
For infantry, the effect usually works best when concentrated on the boots, the bottom of cloaks, kneepads, and the edges of the base. For cavalry, it adds visual weight to the hooves and lower legs. On vehicles and machinery, think about the path of the wheels or tracks: mud accumulates in recesses, mudguards, lower hulls, and protected areas, while exposed surfaces receive lighter splatters.
The finish also dictates the look. Dry or dusty mud is typically matte and features lighter tones. Wet mud is darker, denser, and can have satin or glossy spots. Freshly churned mud has volume and contrast; mud that has been drying for days shows cracks, lighter edges, and pigment accumulated in the recesses.
The Best Mud Effects for Miniatures Based on Finish
There is no single bottle that solves every terrain. The most useful choice depends on whether you are looking to build volume, tint an existing texture, or finish the wet look.
Textured Pastes for High-Volume Mud
Acrylic pastes loaded with sand or fine particles are the most straightforward option for bases, roads, and lower vehicle hulls. They are applied with an old brush, a palette knife, or a toothpick, allowing you to model ruts, footprints, and buildups. They are especially practical if you want a durable surface for gaming, as they adhere firmly once dry and accept additional paint.
It is best to apply them irregularly. A completely flat texture looks like spread putty, whereas small mounds, dragged areas, and thinner edges make the terrain look much more natural. If the paste contains grit, reserve the coarser textures for large bases, scenery, or vehicle scales. On 28mm miniatures, a fine texture usually offers a more proportionate result.
Their main limitation is that many pastes dry with a uniform tone. That initial color is a useful base, not the final finish. A dark wash in the recesses, drybrushing on the edges, and some pigments will completely transform the result.
Pre-Colored Mud Effects
Pre-colored effects save time when you need to prepare an entire unit or gaming scenery. They are usually formulated with the right density and colors designed for light mud, wet earth, reddish clay, or dark soil. They work great as a first layer, especially if you want to maintain consistency across multiple bases.
The advantage is obvious: less mixing and a uniform color from the start. The downside is that, used alone, they can leave a repetitive finish. To avoid this, mix two tones on the same base or apply the second color only to specific areas. Dark mud around a puddle and lighter mud on raised areas already create a convincing look.
There is no need to use large amounts. On troop miniatures, a thin layer on the base and a few buildup points next to rocks, logs, or boots are usually enough. Too much product can hide base details or make a fantasy figure look visually heavy.
Pigments for Dry Earth and Transitions
Pigment powders are one of the most effective resources for breaking up uniformity. Applied dry over a pre-painted texture, they add dust, loose dirt, and tone variations without adding too much volume. They are ideal for dry roads, base rims, wheels, vehicle skirts, and transitions between mud and vegetation.
On a wet base, use them sparingly on the raised and outer parts. Terrain does not dry evenly everywhere: exposed edges and trodden areas can lighten before the recesses do. On a vehicle, concentrate light pigment on the dust clinging to the bodywork and leave dark tones for the lower areas.
Fixing pigments comes with a visual cost. Without a fixer, they maintain a very matte and natural look, but they can rub off with handling. With a medium or fixer, they gain durability, though they tend to darken. For miniatures intended for frequent gaming, it is preferable to fix them in exposed areas and accept that you might need to touch up a few light spots at the end.
Wet Effects and Splatters
Gloss should be selective. Varnishing an entire base to represent wet mud usually produces a plastic look, especially under gaming table lighting. It is more believable to apply a glossy varnish, transparent medium, or water effect only at points where moisture would logically gather: deep footprints, puddles, boot soles, or sludge trapped between tracks.
Splatters add motion. You can create them by loading a stiff brush and flicking it against another brush or a stick—always with the miniature protected and testing beforehand. On a foot soldier, splatters should only rise slightly from the base. On a vehicle that has crossed muddy terrain, they can reach the sides, but they should follow a direction and not cover every panel equally.
How to Build Believable Mud on a Base
A simple sequence prevents the effect from looking disconnected from the rest of the miniature. Start by creating the texture with textured paste, fine sand, or a mixture of both. Leave some areas smooth: real terrain has compacted zones, not a continuous layer of grit.
Once the base is dry, paint a dark layer to act as a shadow. Over it, work mid-tones of brown, red, ocher, or grey depending on the environment you want to represent. You don't need to use many colors, but you do need to separate the depths from the raised parts. A gentle drybrush on the edges helps define the texture without turning it into light sand.
Then add pigments or fine dirt in localized spots. Place grass, tufts, or roots once the ground already has color, so they don't look like elements glued on top of a clean layer. Finally, reserve the wet finish for the recesses. This last phase is what provides contrast, so less is usually more.
If you want to represent footprints, press them in before the paste dries. The boots of another miniature, a loose wheel, or a piece of track can serve as a stamp. Do not aim for perfect repetition: variation between footprints makes the terrain look lived-in.
Common Mistakes When Applying Mud
The most common mistake is using a single brown for everything. Even a muddy field contains changes in temperature and humidity. A little ocher, grey, earth red, or black applied in the right places avoids the look of a base painted in a flat color.
It is also important to control the scale of the particles. Realistically sized gravel for a 28mm base can look like massive rocks. If you want fine soil, use very fine sand, pre-made fine texture, or pigments. Leave coarser elements for specific rocks, debris, or larger-scale terrain.
Another issue is placing mud where there is no logical reason for it. A warrior advancing through a marsh might have it on their boots and the lower part of their gear. A miniature on a dry street does not need the same splatters. Keeping the relationship between the base, the figure, and the table scenery makes every effect more convincing.
Preparing Units and Scenery with Coherence
In a full army, consistency matters more than an exceptional single base. Choose a palette of two or three earth tones, a main texture, and a moisture level. Then vary the placement: not every soldier steps in the same puddle, and not every vehicle crosses the same section of the road.
For scenery, work from dark to light and reserve the wettest areas for ditches, riverbanks, building entrances, or vehicle tracks. Mud effects also work great for tying different elements together: a barricade, a rock, and a bush look like they belong on the same board when they share some dirt at the base.
At Terrainandminis, you will find the materials to approach this process layer by layer, from textures and pigments to environmental effects and vegetation. Choosing compatible products makes it easier to maintain the same terrain across miniatures, vehicles, and tabletop pieces.
The next time you finish a miniature, don't add mud out of habit. Decide what ground it is standing on, how long it has been there, and where it has moved. With that little story in mind, a simple base can gain more character than a whole layer of directionless effects.






