
 Español

How to Magnetize Miniature Bases: The Ultimate Guide for Wargaming & Painting
- 07/25/2026 09:54:03
- Home , Assembly and Painting Guides
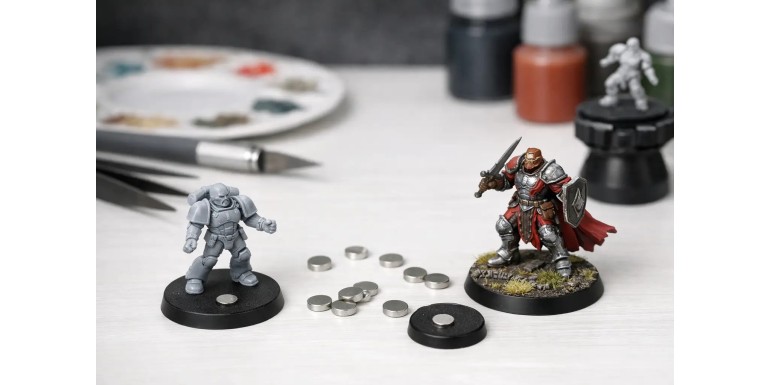
A fully painted miniature should never arrive at the tabletop with bent weapons, chipped paint, or stuck to other figures at the bottom of a carrying box.
This guide to magnetizing miniature bases has one clear goal: ensuring that every unit in your army travels safely, deploys smoothly, and packs away without destroying hours of assembling and painting work.
Neodymium magnets are a simple, cost-effective storage solution, but not all magnets fit all bases. The diameter, thickness, base material, and overall weight of the figure drastically affect the final result. A magnet that is too weak won't hold anything; one that is overly strong can tear itself off the base or rip up the metal sheet inside a lightweight transport tray.
What Magnets Should You Choose for Your Miniature Bases?
For standard plastic or resin miniatures, disc-shaped neodymium magnets (rare-earth magnets) are the industry standard. They take up minimal space, offer high magnetic hold, and can easily be embedded underneath the base if there is enough clearance.
When choosing magnets, diameter is only half the equation—thickness and pull strength are equally critical.
-
25mm to 28mm Round Bases: A 5 x 2 mm magnet generally works best for light plastic infantry.
-
32mm to 40mm Bases: For slightly heavier models or larger footprints, a 5 x 3 mm or 6 x 2 mm magnet provides a safer margin.
-
Metal Miniatures, Cavalry, & Large Models: For heavy metal models, top-heavy conversions, or small monsters, it is always better to distribute the weight using two smaller magnets rather than installing one giant magnet in the center.
Key Magnet Sizes by Miniature Type
As a starting reference, these combination guidelines work well for most wargames (Warhammer 40K, Age of Sigmar, Star Wars: Legion, D&D):
| Miniature Type | Recommended Magnet Size | Quantity |
| Light Plastic Infantry (25–32mm) | 5 x 2 mm | 1 |
| Metal Infantry, Characters, & 40mm Bases | 5 x 3 mm or 6 x 2 mm | 1 |
| Cavalry, Bikes, & Top-Heavy Miniatures | 5 x 2 mm | 2 (spaced apart) |
| Monsters, Vehicles, & Large Display Bases | 5 x 2 mm or 6 x 2 mm | 3+ (near weight points) |
Pro Tip: Scale alone does not dictate magnet choice. A 28mm metal figure with a dramatic, leaning pose often requires more magnetic hold than a wide, low-profile plastic vehicle.
Your transport tray matters too: a carry case lined with a solid ferrous steel sheet provides much stronger attraction than a ultra-thin magnetic vinyl sheet, while aluminum surfaces will not attract magnets at all.
Step-by-Step: How to Attach Magnets to Bases Without Damaging Them
The cleanest installation method is flush-mounting the magnet inside the bottom cavity of the base. This preserves the original height of the miniature and ensures the base sits flat on the gaming table.
1. Dry Fit First
Before applying glue, test-fit the magnet dry. Make sure the magnet sits slightly below or completely flush with the bottom edge. If it protrudes even slightly, the miniature will wobble during gameplay and the magnet will take repeated direct impacts every time you set it down.
2. Drill or Carve the Cavity Carefully
If you need to create or expand a socket, use a hand pin vise or a drill bit matching the exact diameter of the magnet.
-
Plastic: Drill slowly by hand or at low power tool speeds to prevent melting or pushing through the top of the base.
-
Resin: Handle with extreme care—resin is brittle and cracks easily under pressure. Always wear an appropriate dust mask and clean up resin dust thoroughly.
3. Choose the Right Adhesive
-
Super Glue (Cyanoacrylate): Fast-setting and sufficient for light infantry on clean surfaces.
-
Epoxy Putty (Green Stuff / Milliput) or 2-Part Epoxy Glue: Recommended for larger magnets, heavier bases, or deep cavities with extra clearance. Putty gives structural support and a stronger mechanical bond.
Caution: Do not overfill deep sockets with glue before inserting the magnet, as hydraulic pressure can push the magnet downward, causing it to stick out past the bottom edge.
Polarity: The #1 Mistake to Avoid
All your magnets must be installed facing the exact same magnetic direction. It sounds obvious, but flipped polarity is the single most common mistake hobbyists make when magnetizing entire armies. If a magnet is installed upside-down, the model will be repelled by your tray or movement templates.
How to Guarantee Correct Polarity Every Time:
-
Keep your magnets in a single stacked column.
-
Mark the top face of the top magnet with a permanent marker before separating it.
-
The Tray Technique: Place a loose magnet onto your transport sheet, put a drop of glue inside the miniature base cavity, and lower the miniature directly onto the magnet. Let it dry completely in place. This guarantees perfect alignment and consistent polarity across your whole collection.
Safety Note: Keep large stacks of neodymium magnets away from completed miniatures. Their strong pull can cause unattached magnets to snap together violently, which can chip painted surfaces or shatter brittle magnets.
Magnets, Washers, and Ferrous Sheets
You don't always need magnets on both sides of the connection. For standard miniature transport, the most effective setup uses magnets under the bases sticking to a ferromagnetic surface inside your case.
-
Compatible Metals: Mild steel, galvanized steel, and iron sheets.
-
Incompatible Metals: Aluminum, copper, brass, and most stainless steel alloys (they are non-magnetic).
Using Metal Washers
Metal washers offer an alternative approach. They can be glued underneath hollow bases to stick to magnetic sheets in transport cases or movement trays. While inexpensive and adding nice stability weight, washers add visible thickness and can look bulky on smaller 25mm bases.
Flexible Rubber Steel Sheets
Rubberized steel sheets inside carrying boxes are very popular, but check their adhesive backing. If the magnetic pull lifts the sheet off the case floor when pulling out figures, reinforce the sheet using high-grade double-sided tape or contact adhesive. Always test your heaviest model on a sample sheet before magnetizing an entire army.
When Are Magnets NOT the Best Option?
Magnets aren't a universal solution for every model type:
-
Clear Acrylic Bases: Drilling clear bases leaves unsightly white stress marks, and mounting external magnets ruins the transparent aesthetic. For clear bases, foam tray cutouts or custom clip systems are far better.
-
Fragile Resin Ankle Joints: Avoid overly powerful magnets on top-heavy resin models with thin ankles. Pulling a delicate figure off an excessively strong steel sheet can snap the model at its weakest point. The goal is slide prevention during transport, not locking the model down like a vise.
-
Electronic & Card Safety: Keep magnetized armies away from sensitive electronics, magnetized strip cards, or digital equipment stored in your gaming bag.
Building a Functional Transport System
Magnetizing bases works best when planned as a complete ecosystem:
1. Measure Box Heights: Always account for tall banners, raised spears, or wings before fixing shelves in your transport box.
2. Leave Finger Clearance: Leave enough space between units so you can pick up models by their bases, rather than pulling on fragile weapons or capes.
3. Organize by Unit: Label trays by faction or unit size to speed up deployment and reduce unnecessary handling time.
4. Protect Base Edges: If your bases feature flock, sand, or water effects, keep the bottom rim clean so texture debris doesn't prevent flush contact with the tray.
Final Checklist: Test Before You Commit
Start by magnetizing a single test squad and taking them on a real commute. If you can tilt the transport box slightly without figures sliding, yet pull them free effortlessly without strain, you've found the ideal magnet combination.
Taking ten minutes to test your setup now will save you hours of rebuilding damaged models later—leaving you with more time for what matters most: painting, building terrain, and rolling dice.






