
 Español

Guide to Thematic Bases for Miniatures
- 07/19/2026 18:34:07
- Home , Assembly and Painting Guides
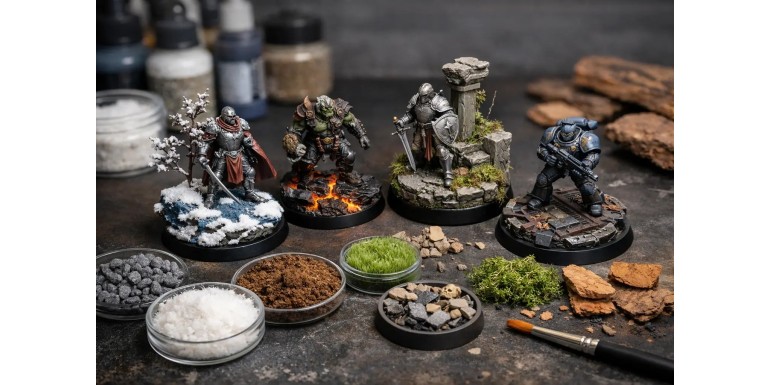
A beautifully painted miniature can lose its impact on a blank base, but an overly cluttered one can make it hard to read from gaming distance. This guide to themed bases starts with a simple concept: the base isn't just a final accessory—it is the piece that connects the figure to its army, gaming table, or diorama.
The goal isn't to crowd every single millimeter with details. It is about creating a believable, durable, and well-proportioned surface that reinforces the miniature's story without compromising its stability or gameplay usability. A warrior standing on ruins, a scout in a humid forest, or a vehicle tearing through a desert all tell a better story when the base shares the same internal logic as the rest of the project.
Before You Start: Decide What the Base Should Tell
The first decision isn't which static grass to use or what pigment to apply. It's the environment. Think about the faction, the setting, and the overall tone of the collection. A full army gains a striking presence when its bases share a common palette, a dominant texture, and a few recurring elements—even if no two bases are identical.
For an army, it is best to work with a simple recipe that you can repeat across dozens of figures. A mix of fine sand, small rocks, a base coat, and two tones of vegetation is usually more practical than a complex composition that is hard to replicate. You can save the extra variation, height, and narrative weight for a skirmish warband or a display miniature.
You also need to consider where the miniature will be seen. On the tabletop, how it reads from a few feet away matters more than micro-details. In a display cabinet, a base can accommodate finer layers, machinery scraps, signs, or highly detailed vegetation. Neither option is inherently better; it just depends on whether you want production speed, unit cohesion, or a striking focal piece.
Themed Base Guide: Scale and Composition
Scale is the filter that prevents many common mistakes. A rock that looks perfect on a monster base can look like a massive concrete block next to a 28mm miniature. Similarly, a very long grass tuft might work on a jungle base, but it will bury a figure's legs if placed without care.
Before gluing anything down, do a dry fit of your elements. Place the miniature on the base and check three things: that the feet rest naturally, that the main scenic element doesn't compete with the figure, and that there is enough room left to paint. If a weapon, cape, or limb overhangs significantly, your composition needs to respect that silhouette.
Using a directional line is a highly effective technique. This could be a path, a crack, a wooden plank, a dry riverbed, or the slope of a rock. This line guides the eye toward the miniature and keeps elements from looking scattered at random. Always leave some cleaner areas of ground. Negative space also helps the scene make sense.
On small round bases, a single point of interest is usually enough: a rock, a skull, a puddle, or a piece of wall. On cavalry, monster, and vehicle bases, you can create multiple levels, but avoid raising the figure so high that it no longer fits in with the rest of the unit. Height adds drama, but it can cause issues when storing, transporting, or measuring on the tabletop.
Materials That Get the Job Done
Your choice of materials should match both the effect you want and the durability you need. Sand and fine gravel are reliable foundations for dirt, paths, and arid areas. Cork allows you to create lightweight rocks, ruined edges, and uneven terrain—especially if you tear it into irregular pieces instead of cutting it too cleanly.
Texture pastes speed up production bases significantly. Applied with an old brush or a palette knife, they create a consistent surface in just a few steps. You can vary their finish by pressing in sand, small stones, or track marks before they dry. For mud, snow, or wet ground, specialized textures usually offer a more stable result than mixing random materials on the fly without testing them first.
Vegetation needs a contrast of sizes and tones. Uniform static grass can look flat, whereas combining short grass, tufts, dead leaves, or small flowers adds real depth. You don't need to use everything at once. On snowy terrain, for example, a few muted blades peeking through the snow tell a better story than full plant coverage.
For urban ruins or sci-fi themes, debris must maintain a recognizable scale. Pieces of pipe, mesh, cables, metal plates, or rubble work well when they look like part of a larger structure. Avoid objects that clearly give away a different scale, like excessively thick chains or screws that turn into giant pieces of heavy machinery next to a figure.
Build in Layers, Not Accumulation
A themed base works best when each layer has a specific job. Start with the shape: use cork, putty, rocks, or paste to define slopes and elevations. Next, add the main texture. Finally, incorporate specific details like grass, debris, puddles, or snow. This order reduces the risk of covering up finished elements and helps you control the overall volume.
Secure sand and loose elements with PVA glue or specialized adhesives, making sure the glue doesn't pool visibly. Once dry, seal the surface with a highly diluted layer of glue if the material is particularly fragile. It's a quick, unglamorous step, but it keeps gravel from chipping off when handling the miniatures during a game.
Paint should unify the mix. Even if you use multi-colored sand, cork, and real rocks, a shared primer and base coat will make everything look like it belongs to the same ground. From there, apply washes to define depth and drybrushing to pick out the textures. On natural terrain, your tones don't have to be perfectly uniform; subtle variations between browns, ochres, greys, or greens make the surface feel alive.
Pigments are great for dust, parched earth, and color transitions, but use them in moderation. They work exceptionally well on boots, wheels, and the lower sections of vehicles to tie the figure and base together. If you apply them across the entire surface without a clear plan, they can dull the contrast you already built with your paint.
Water, Mud, Snow, and Ash Effects
Environmental effects turn a generic recipe into a base with personality, but they benefit the most from advance planning. Water should always be applied inside a sealed border or depression. A small puddle next to a stone or a broken canal is usually more convincing than covering half the base in perfectly flat resin.
Mud gains realism when it combines volume and gloss. Build the texture first with paste or sand, paint it in dark tones, and save the glossy finish for the truly wet areas. If everything reflects light equally, it will look like varnish over dirt, not fresh mud.
Snow requires a realistic accumulation logic. It settles in recesses, on flat surfaces, at the base of rocks, and in sheltered corners. A uniform white coat over every element usually erases all the textured detail. Add cool tones in the shadows and let some of the ground underneath show through to avoid an artificial look.
Ash, industrial dust, and volcanic terrain call for a limited palette. Greys, blacks, desaturated browns, and tiny warm accents work better than a mix of intense colors. If the miniature already has colorful armor or a vibrant uniform, a understated base is often the best choice to keep the focus on the figure.
Consistency Between Base, Miniature, and Board
A base doesn't need to perfectly match the table you play on, but it should belong to the same visual universe. If your gaming board is bright green and your bases are reddish desert, the miniatures can look disconnected during play. On the other hand, a neutral earth base with limited vegetation easily adapts to different boards without losing its character.
The base's color palette also impacts how the figure reads. Miniatures with dark armor benefit from light or mid-tone bases; white, yellow, or highly luminous figures tend to pop against darker terrain. This isn't about mechanically choosing the exact opposite color, but rather ensuring that the boots and the overall silhouette don't blend into the ground.
To maintain cohesion across a large collection, prepare your materials and colors before starting the first unit. Write down the recipe: texture, base colors, wash, drybrush, vegetation, and special effects. Having this reference allows you to expand the army months later without having to guess how you achieved the initial look.
Common Mistakes to Avoid
The most common mistake is treating every base like a miniature display scene. Debris, plants, rocks, casualties, snow, and water effects can all work together, but they don't all need to appear every time. Pick one or two elements that define the environment and repeat them with variations.
It is also worth paying attention to the rim of the base. Painting it a clean, uniform color that complements the army gives a sense of completion that no amount of detail can replace. If you run texture all the way to the edge, make sure it doesn't spill over the rim or create burrs that stop the miniature from sitting flat.
Finally, prioritize durability for gaming pieces. Elements that are tall, very thin, or glued to the outer edges can snap off when transporting the unit. Reserve delicate conversions for characters, monsters, or dioramas, and keep your basic troops on a solid recipe that you can batch-paint quickly.
A good themed base doesn't need to steal the spotlight from the miniature. It just needs to make the ground beneath its feet believable, maintain the collection's cohesion, and endure just as many games as it did painting sessions.






