
 Español

How to Make Realistic Desert Miniature Bases: Step-by-Step Guide
- 07/29/2026 16:50:45
- Home , Assembly and Painting Guides
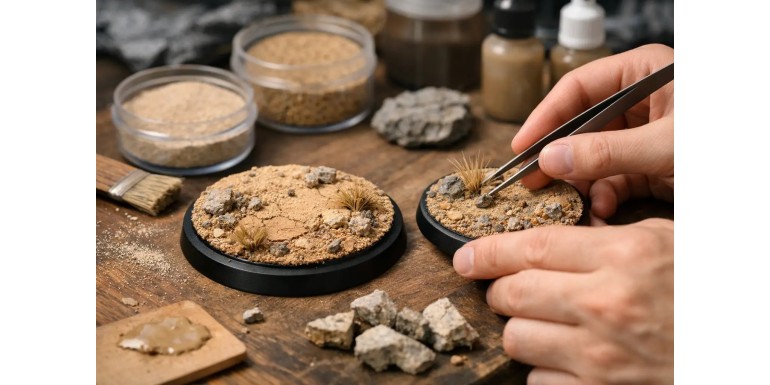
A realistic desert base does more than just hold a miniature: it places your regiment, hero, or vehicle in a specific, tangible world. The difference between a plain base covered in uniform sand and a believable piece of terrain comes down to height variation, natural color shifts, and small details that break up repetition.
If you want to learn how to make realistic desert miniature bases, the goal isn't just to cover the base in sand—it's to recreate dry, weathered ground exposed to sun, wind, and foot traffic.
This step-by-step desert basing guide works for everything from individual infantry bases to large monster, vehicle, and display bases. You can easily simplify it to batch-paint an entire army or layer on extra pigments and vegetation for a showcase display miniature.
Before You Start: Choose Your Desert Environment
Not all deserts are rolling yellow sand dunes. A rocky desert features compacted earth, angular stones, and muted brown or reddish tones. Sand dunes call for smooth transitions, minimal rocks, and fine-grain sand. On the other hand, a canyon or Martian wasteland invites cracked earth, flat stone slabs, rust tones, and high-contrast highlights.
Selecting your reference before gluing down materials prevents a common hobby mistake: mixing gray rocks, yellow sand, bright green grass tufts, and red pigment without a cohesive vision. Your color palette needs to tell the same story across the entire base. For an army project, test your scheme on a spare base first to approve the look before mass-producing dozens of units.
Scale is another critical factor. A stone that looks subtle on a 40mm base can look like a massive boulder next to a 28mm infantry model. Coarse textures generally work best on large bases or terrain pieces; fine-grain textures and contained details look far more proportional on infantry.
Materials for Realistic Desert Bases
You don't need every product on the market, but you do need to mix materials that offer different heights, grain sizes, and finishes. A practical desert basing kit includes:
-
Texture paste, light putty, or epoxy putty for sculpting elevation shifts.
-
Fine sand, micro-gravel, and a few small rocks or cork fragments.
-
PVA glue (white glue) or base adhesive, plus superglue (cyanoacrylate) for heavier elements.
-
Primer and acrylic paints in browns, ochres, desert sand, bone, and reddish tones.
-
Dark and light washes/shades to define recesses and tie tones together.
-
Powdered weathering pigments (earth, dust, or sand) for a dry, matte finish.
-
Dead vegetation, arid tufts, roots, skulls, or thematic scatter pieces.
Outdoor sand can work, but it must be completely dry and sifted. For consistent, predictable results, hobby-grade modeling sands are much easier to work with—they maintain uniform grain size so you can replicate the exact finish across an entire army.
Step-by-Step: Texturing Desert Miniature Bases
Create Elevation Without Crowding the Miniature
Start with your miniature already secured to the base, or—if sub-assembling—mark its foot placement using poster putty. Build up a subtle elevation on one side of the base rather than a mountain right in the center. A low rise using texture paste creates a far more dynamic composition, making the figure look like it's cresting a small ridge or stepping around a rock.
Apply the texture paste with an old spatula or worn-out brush. Avoid making a perfectly smooth surface; press and drag slightly to create natural irregularities. If you are going for smooth sand dunes, smooth out tool marks before the paste dries. For hard, parched earth, leave sharper cuts and cracked textures.
Place two or three rocks of varying sizes partially submerged into the paste. Rocks sitting flat on top of a surface look glued-on after the fact; rocks emerging from the ground look natural. Broken cork works exceptionally well as sedimentary rock, while slate creates sharp, flat slabs. Use materials in moderation so you don't mix conflicting geologies.
Mix Grain Sizes for Natural Variance
Once your base relief is dry, apply PVA glue slightly diluted with water to selective areas. Sprinkle fine sand and leave a few patches of smooth ground visible. Next, drop a few larger gravel grains near the rocks, along the edges of your raised terrain, or around the miniature's feet.
This pattern mimics natural sediment accumulation. Real ground doesn't have identical texture across every square inch—wind deposits fine dust in sheltered areas and leaves bare rock or hardpan exposed elsewhere. Avoid creating a uniform ring of sand around the edge of the base, as this gives away the application process.
After the glue dries completely, use a soft, dry brush to clear away loose sand from the model's boots, robes, or armor. This is also the ideal time to clean up the rim of the base—excess sand clumped over the edge will ruin an otherwise clean result.
Painting Desert Bases: From Deep Shadows to Surface Dust
Basecoat the base alongside the miniature or separately. A dark brown, black, or terracotta primer provides a solid foundation for most desert schemes. While posterior layers do most of the visual work, a dark basecoat ensures deep shadows beneath rocks and between sand grains.
-
Base Color: Paint the entire surface with a medium brown. For a classic sandy desert, build up toward ochres and warm sands; for reddish arid soil, layer up using muted terracottas and leather tones. You don't need a massive array of paints—a solid base color, a wash, and three distinct drybrushes usually yield better results than subtle, near-identical paint steps.
-
Shading: Apply a dark brown wash into crevices, around stones, and under overhangs. If the finish looks too uniform, apply a second targeted wash of sepia or reddish brown. Keep washes localized rather than drowning the whole base, which turns the finish flat and glossy.
-
Drybrushing: Work progressively from dark to light. Start with a muted ochre, move to a light sand color, and finish with a light drybrush of bone or ivory strictly along rock edges and the highest textures. Each drybrush layer should cover less area than the previous one. If your final highlight color invades the entire base, the ground loses depth and looks chalky.
Add Subtle Color Variations
Deserts require color variation, but subtlety is key. Stipple small areas with reddish brown, grayish beige, or muted yellow before your final drybrush. On a 25mm or 32mm base, subtle hints of these shades are enough. For vehicles and large scenic bases, thin glazes applied irregularly help simulate drift layers and differing soil compositions.
Rocks should stand out from the ground even if they share part of the same color palette. Paint them slightly grayer, redder, or darker than the surrounding sand, then drybrush a bit of the ground color over them to tie them back together. This makes them look naturally dusted over while maintaining their own distinct material identity.
Weathering Pigments and Arid Vegetation
Pigment powders provide a bone-dry, matte finish that acrylic paints can rarely match on their own. Light sand pigment applied with a dry brush along the base of rocks, footwear, and exposed terrain elevates realism instantly. Reddish pigments added sparingly into deep cracks add rich color depth.
Pro-Tip: Apply pigments in small passes. If you use a liquid pigment fixer, the color will darken slightly. If left un-fixed, the color stays vibrant, but it may rub off with heavy handling. For tabletop gaming armies that see frequent transport, seal pigments carefully or keep loose powders reserved for deep, protected areas.
Vegetation should be sparse. A single dry grass tuft, a thin root fragment, or a small patch of dead shrubbery near a rock is usually enough for an infantry base. Saturated green foliage rarely looks right on a desert base unless you are deliberately building an oasis or post-rainfall environment. Choose beige, muted olive, greenish-gray, or dry brown tufts.
Thematic scatter items—like a skull, discarded helmet, wooden crate, or broken weapon fragment—add narrative depth as long as they fit the scale and setting. Accessories should support the scene, not distract from the miniature. If the first thing someone notices is a piece of base scatter, it is likely too large or visually overwhelming.
Maintaining Army-Wide Cohesion
The best army basing recipe isn't the most complex—it's the one you can repeat consistently across dozens of models. Lock down your base color, your two primary drybrush shades, your sand texture mix, and your final weathering pigment. Once those are fixed, vary the placement of rocks, tufts, and elevation profiles so each base feels unique without breaking unit cohesion.
Batch processing speeds up production dramatically:
-
Texture all bases in one session.
-
Apply sand mixes to all models.
-
Prime and paint base colors in a assembly-line workflow.
-
Finish with drybrushing, tufts, and pigments.
Reserve custom rock formations, narrative scatter pieces, and elaborate pigment work for HQ characters, unit leaders, monsters, and large vehicles.
A convincing desert base doesn't require a dozen complex steps. It requires clean composition, proportional texture scales, and dusting applied where environmental wear naturally occurs. When your miniature looks like it is actually standing in the environment—rather than sitting on top of it—your base has done its job.






