
 Español

Realistic Diorama Foliage Guide: Pro Tips for Scale Terrain
- 11/16/2026 11:33:28
- Home , Assembly and Painting Guides
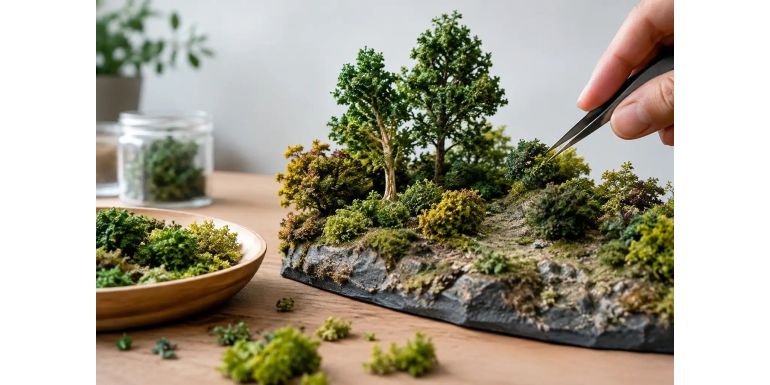
A beautifully painted tree can instantly lose its impact if it springs from a flat, uniform green base. In a scale scene, terrain isn’t just background filler—it defines the season, the humidity, the state of abandonment, and even the visual flow toward the miniature. This diorama foliage guide is built on one core idea: vegetation needs volume, variety, and a logical relationship with the ground it grows on.
Foliage works just as well for an individual display base as it does for a full wargaming table, but the demands are different. An exhibition diorama can feature delicate branches and fine, loose accumulations; gaming terrain requires materials that resist wear and tear with a much firmer hold. Getting these choices right from the start saves you from redoing work once the paint, mud, or figures are already in place.
1. Start with Scale and Scene Type
Before breaking out the static grass or tufts, decide what story the terrain is telling. A damp ditch, a dry Mediterranean hillside, the edge of a temperate forest, and an overgrown ruin do not share the same color distribution or vegetation height. The most common mistake isn't using an unrealistic material—it's using it out of context.
Scale dictates the apparent size of every single fiber, leaf, and tuft. For 28–32 mm scale, 2 mm fibers work well as short-cropped grass, while 4 to 6 mm fibers suggest overgrown grass, path borders, or meadow areas. Save 10–12 mm fibers for reeds, tall vegetation, or specific focal points; covering an entire base with them will make your miniatures look like they are drowning.
In smaller scales, such as 15 mm, fine blends usually yield better results than sharply defined tufts. Conversely, for 54 mm or vehicle dioramas, individual plants, ferns, subtle flowers, and branches with recognizable silhouettes are a fantastic touch. It’s not about measuring every single leaf—it’s about maintaining a credible visual read from the distance the piece will be viewed.
2. Build in Layers
Real vegetation grows on uneven ground. That is why foliage always looks more convincing when built up in layers from the bottoming up, rather than simply gluing tufts onto a finished surface.
1. Terrain prep: Start by texturing the ground with sand, texture paste, fine gravel, cork, or small stones.
2. Basecoat: Paint the earth base with variations of brown, gray, ochre, or reddish tones depending on the environment.
3. Weathering: Once dry, apply pigments, washes, or drybrushing to bring back depth.
4. Vegetation: Only now should you add low-lying vegetation—dark earth, leaf litter, fine flock, or short fibers. Medium tufts and shrubs come next, followed by tall plants or dry branches used as final accents.
This sequence allows you to correct or adjust the terrain without accidentally staining delicate elements.
Pro-tip: Never cover 100% of the surface. Leave patches of exposed earth, stones, roots, or leaf debris. Vegetation naturally concentrates where moisture is retained, near obstacles, and in cracks; it is scarce on trodden paths, exposed slopes, or very dry ground. A narrow trail with greener edges tells an immediate story without needing extra accessories.
3. Mix Tones to Avoid the "Toy Effect"
Pure, single-tone green rarely looks right. Even in spring, a meadow combines muted yellows, olive greens, straw-colored fibers, and dark shadows near the ground. Mix two or three shades of static grass in a container before applying them, or work in zones with different blends. The key is to have a clear dominant color—not a rainbow.
-
For dry terrain: Start with beige, ochre, and muted olive green.
-
For a damp scene: Incorporate darker greens, deep browns, and yellowish tips.
-
For an autumn forest: Leaf litter will carry more visual weight than grass. Reddish browns, ochres, and faded leaves yield a much more natural result than a fully green floor.
Use bright colors and flowers sparingly. A few yellow, white, or violet flowers can add scale and contrast, but a base packed with saturated dots looks like artificial decoration. Place them in small clusters, especially near tufts and less-traveled areas.
4. How to Fix Grass, Tufts, and Shrubs
-
Glues: Diluted white glue is great for flock, leaves, and short fibers, especially when applied with a brush to controlled areas. For pre-made tufts, a tiny drop of cyanoacrylate (super glue) is quick and effective, though watch out for glossiness if overused. Contact adhesive or specialized scenery glues offer a stronger hold on heavy pieces, but require precise placement.
-
Static Grass: Static grass looks best when the fibers stand upright. An electrostatic applicator makes this easy on large surfaces, though it's not strictly necessary for a small base or diorama. If applying by hand, drop the fibers onto fresh glue, press down very gently, and brush away the excess once dry. You’ll get a less uniform coverage, which is actually great for worn, heavily used terrain.
-
Shrubs and Bushes: Visible roots matter. Insert a natural dry twig, a piece of covered wire, or a commercial trunk into a hole in the terrain before gluing the foliage. Then, build up fibers, lichen/sponge foliage, or leaves in irregular zones. A bush with the exact same density on all sides looks like a kitchen sponge—leave gaps, exposed branches, and a darker base.
If your piece is going to be transported or used heavily in gaming, check its durability. Tall plants and trees take the most hits. Reinforce their joins with putty, blend the base of the element into the dirt, and avoid placing them right where people will grab the scenery. For gaming tables, slightly sturdier, well-anchored vegetation is always the smarter choice.
5. Composition: Let the Terrain Lead
Composition isn’t about scattering tufts in a neat, regular grid. Look for natural clusters and transitions. Three tufts of different sizes huddled next to a rock look far more organic than six spread out at equal distances. A well-placed shrub can hide the awkward join between a wall and the ground; tall fibers can draw the eye directly toward a miniature or vehicle.
Think about narrative scale, too:
-
In an abandoned ruin, vegetation sprouts through cracks, at the foot of walls, and around accumulated rubble.
-
Along a road, it hugs the shoulders, ditches, and pavement cracks.
-
In a recent combat scene, leave flattened areas, exposed mud, and scattered plant debris.
Foliage gains immediate credibility when it reacts to a visible cause.
Finally, avoid a hard, perfect edge around your green patches. Fade a patch of flock out into bare earth using more scattered fibers, tiny pinches of pigment, and stray bits of leaf litter. Smooth transitions make completely different materials look like they belong to the exact same piece of earth.
Final Takeaways: Common Mistakes and How to Fix Them
1. Using too much: If a base looks like a thick shag carpet, pull up some tufts or break up the uniformity with earth and stones.
2. Ignoring direction and height: Flat vegetation on a completely horizontal base loses life. Combine short fibers with tall clusters, but keep the core areas where miniatures stand clear.
3. Forgetting to blend weathering: Apply dust, mud, or moisture effects after your initial foliage. A light brown wash, subtle pigments, or a touch of dirt-colored paint on the base of the plants will seamlessly tie everything together.
4. Overcomplicating the palette: Don't use every single material you own on a single piece. A scene can feature grass, leaves, bushes, and flowers, but it needs a visual hierarchy. Decide which vegetation dominates and let the rest play a supporting role.
A comprehensive catalog like the one at Terrainandminis.com lets you find specialized materials for any biome, but your selection will always be more effective when driven by a specific scene rather than the impulse to use everything at once.
The best foliage doesn't scream for attention on its own—it makes the ground look lived-in and ensures the miniature truly belongs there. Observe how vegetation grows in your reference photos, build up the main masses first, and save the fine details for last. That is where a simple base transforms into a real scene.