
 Español

PLA Terrain for Wargames: How to Choose & Paint It
- 11/13/2026 08:50:46
- Home , Tabletop Terrain
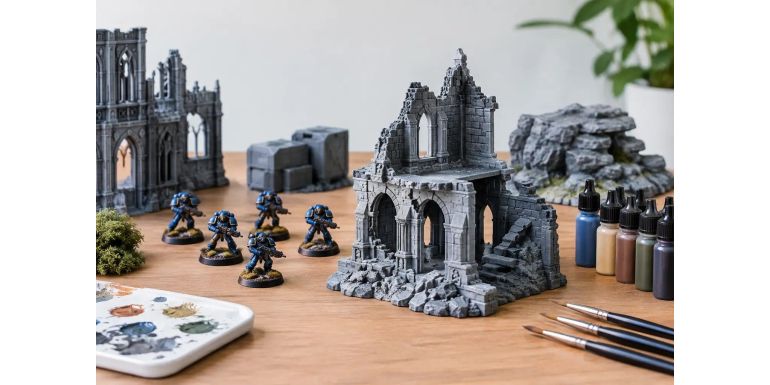
Good PLA terrain can fill a gaming table with buildings, ruins, containers, walkways, or natural elements without requiring weeks of scratch-building. 3D FDM printing has greatly expanded the options for wargames, tabletop RPGs, and dioramas, but a freshly printed piece isn't always ready for the tabletop. Choosing the right design, prepping the surfaces, and applying a durable paint job makes the difference between a simple decorative element and terrain that can withstand frequent matches.
What PLA Brings to a Gaming Table
PLA is one of the most common filaments in home 3D printing. It is affordable, easy to print, and makes it possible to produce large pieces with enough detail for 28mm, 32mm, or similar scales. It is especially practical for industrial structures, sci-fi architecture, walls, barricades, and modular buildings.
Its biggest advantage is variety. The same terrain system can include interlocking corners, doors, floors, roofs, platforms, and accessories. This allows you to expand your table in phases and change the layout of the game without buying a completely new board.
It does have limits, however. PLA isn't as impact-resistant as resin or certain injected plastics, can warp under high heat, and retains the layer lines typical of FDM printing. On a terrain piece, these layers can be easily disguised with primer, texture, and paint. On a display miniature, on the other hand, they would demand a much finer finish.
How to Choose PLA Terrain According to Your Game
Before picking a piece, think about how it will be used during a match, not just how it looks in a photo. A spectacular building that doesn’t fit miniatures on its floors or shifts every time a hand touches it ends up being less useful than a simple ruin with good cover positions.
Scale is the first filter. For 28mm games, a door must allow a miniature with a base to pass through without catching on weapons, backpacks, or banners. Windows and parapets also need a height that makes sense for line-of-sight rules. If you play with particularly bulky figures, cavalry, or vehicles, double-check street widths, entry points, and ramps.
Modularity deserves attention. Pieces that separate into stories, feature removable roofs, or connect via walkways make it much easier to place miniatures inside. Plus, they take up less space when stored. On a standard gaming table, it's best to combine tall elements that block line of sight, mid-sized terrain to provide cover, and low details that add character without getting in the way of movement.
Open, Urban, or Fantasy Terrain
An urban table benefits greatly from buildings with interiors, low walls, debris, and signage. For an industrial setting, pipes, storage tanks, platforms, and containers create clear advance routes and allow for varying heights. In fantasy settings, ruins, bridges, towers, and rock formations work best when they aren't isolated: linking them with paths, vegetation, or small transition elements makes the whole setup feel like part of the same world.
For historical or natural tables, PLA can serve as the base structure for a hill, bunker, house, or palisade, but it really shines when you add sand, static grass, flocking, bushes, and other materials. The print provides the shape; the textures provide scale and realism.
Preparing PLA Terrain Before Painting
Preparation doesn't have to turn into an endless chore. The goal is simply to fix what will be visible and what affects how the piece functions. Remove supports with hobby clippers or a craft knife, taking care around railings, antennas, and fine details. Afterward, trim any burrs and clean off the dust with a soft brush or compressed air.
Layer lines don’t need the same treatment across the entire piece. On concrete walls, rock, weathered wood, or corroded metal, they can be nearly hidden beneath proper priming and drybrushing techniques. On smooth plates, abandoned vehicles, or technological panels, they are much more noticeable. For those, you can sand flat areas with fine-grit sandpaper, apply filler putty where there are gaps, and sand again once dry.
Don't over-sand small elements. PLA can lose sharp edges and texture very quickly. Often, it's more efficient to apply a thin layer of PVA glue with very fine sand to a base, or use texture paste on joints and damage, than to try to make the entire print completely smooth.
If a piece arrives split into multiple parts, dry-fit all the connections first. For PLA, cyanoacrylate (super glue) works well on clean contact points, while epoxy adhesive gives you more working time to adjust large or heavy pieces. Reinforce internal joints with rods, metal paperclips, or small pins when dealing with walkways, towers, or elements that will be transported frequently.
Priming: The Step That Unifies the Finish
Primer gives paint something to grip onto and reduces the contrast between the filament, putty, textures, and added pieces. For most terrain, a black, grey, or brown spray primer is a practical choice. Black favors ruins, machinery, and dark scenes; grey makes lighter colors and modern architecture easier to paint; brown fits very well with wood, earth, and stone.
Apply thin coats from a distance, moving the piece to reach recesses, interiors, and undercuts. A coat that’s laid on too heavy can soften details and—on prints with pronounced layer lines—make those lines even more obvious. If the spray leaves a rough texture, it's usually due to too much distance, humidity, or paint partially drying before hitting the surface.
For large terrain pieces, you can also brush-prime specific areas. It’s slower, but it lets you work without wasting product and touch up joints after assembly.
Fast Painting Without a Flat-Looking Table
Terrain paint needs to read well at gaming distance. It doesn't require the same level of smooth transitions as a character miniature, but it does need contrast between materials and enough wear and tear to make volumes stand out. Start with a dark base coat and reserve lighter colors for edges, dust, chipping, and exposed surfaces.
On stone and ruins, progressive drybrushing is usually enough: dark grey, medium grey, and a lighter tone applied with very little paint on the brush. For industrial metal, start with a dark grey or reddish-brown, add rust effects, and pick out some edges with a dull metallic paint. A dark wash in the recesses ties the colors together and gives grills, rivets, and cracks extra depth.
The secret is to vary things without making every single element look completely different. Use a limited palette for the entire table and only change a few secondary tones. For example, if all the buildings share a grey base, you can differentiate sectors with blue doors, green pipes, yellow warning signs, or graffiti. The battlefield will stay cohesive, but it won't look monotonous.
Details That Improve Playability
PLA terrain built for gaming needs to withstand heavy handling. Glue lightweight pieces to a base of MDF, plastic, or rigid cardboard if they tend to tip over. Very thin railings look great, but they break easily when moving units, so it's best to reserve them for low-traffic areas or reinforce them during assembly.
It also helps to clearly mark interactive elements. A brightly colored door, a distinct staircase, or a platform with a contrasting border prevents arguments over access and line of sight. If your rulebook relies heavily on cover rules, make sure there are enough walls, obstacles, and ruins of clear heights, distributed evenly across the table.
To finish and protect your pieces, apply thin coats of matte varnish. Varnish won't make PLA indestructible, but it reduces paint wear and makes it much easier to gently clean off dust. For water effects, glass, or computer screens, localized gloss varnish creates great contrast without altering the overall matte terrain look.
The best terrain isn't necessarily the one with the most pieces or the most intricate detail. It's the one that invites you to place miniatures, creates tactical decisions, and still looks great after dozens of games. Start with a few compatible elements, test how they perform on the table, and expand your scenery based on how your gaming group actually plays.