
 Español

Best Materials for Urban Wargaming Miniature Bases | Guide
- 11/09/2026 08:53:28
- Home , Assembly and Painting Guides
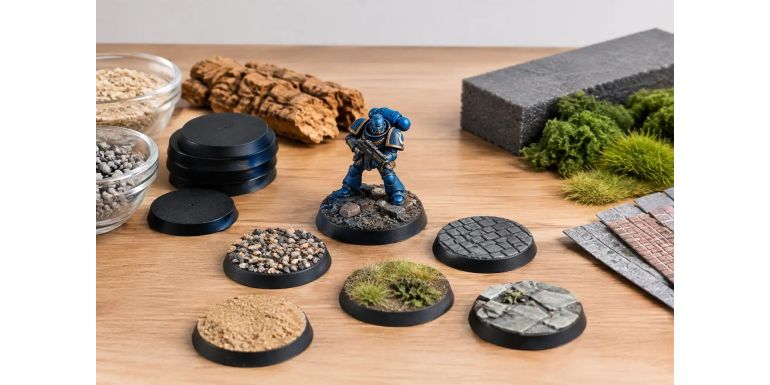
A convincing urban base doesn’t need to be a 10 cm-tall diorama. It needs to tell a story about what is right beneath the miniature's feet: broken asphalt, a chipped curb, dust gathering against a wall edge, or the wreckage of a bombed-out storefront. Choosing the best materials for urban bases is all about balancing volume, texture, and scale without interfering with how the miniatures rank and fit on the tabletop.
On a 25mm or 32mm base, every single element must justify the space it takes up. A piece of brick that is slightly too large looks like ruined architecture at the wrong scale; a texture that is excessively coarse can hide the miniature's feet or prevent it from ranking up alongside other models in your army. The key is to build in layers and save the most eye-catching details for focal points.
The Foundation: Cork, Plastic, and Putty to Define the Ground
Structural material determines the character of the base before you even pick up a brush or apply pigments. For destroyed streets and combat zones, fine cork is one of the most versatile resources. Tearing it with your fingers or tweezers creates an irregular edge that mimics fractured concrete. It works exceptionally well for elevating a slab, marking a curb line, or representing a peeled-up layer of asphalt.
It’s best to use fine-grained cork in thin sheets. Overly thick sheets create unnatural steps on small bases. If you need to use a taller piece, blend the slope using fine sand, putty, or rubble fragments around the edges. A piece of cork glued directly onto a flat base often looks artificial and stands out for the wrong reasons.
Styrene plastic is the cleanest option for industrial paving, tiles, and sidewalks. Smooth sheets allow you to score panel lines with a hobby knife, while textured plates speed up production when you are prepping dozens of bases for a full unit. It is also great for making manhole covers, metal plates, floor panels, and small technical platforms.
Two-part epoxy putty ties these materials together. You don’t need to cover the whole base: use it to smooth transitions, carve cracks, or sculpt small mounds of dirt next to a concrete slab. A smooth ball of putty looks like toy mud, but stippling it with an old brush or a textured stone gives it a much more believable, organic surface.
When to Choose Each Material:
-
Cork: Perfect for ruins, bombed streets, and areas with broken concrete.
-
Plastic: Best suited for sci-fi environments, industrial complexes, and orderly urban paving.
-
Putty: Especially useful when a base needs to bridge different pieces together and eliminate that "collage" look.
In many projects, combining all three yields far better results than relying on just one.
Textures for Urban Bases: Grain Size Matters
Sand is a staple hobby supply, but not all sand represents the same thing. Fine sand simulates dust, mortar, windblown dirt, or grime accumulated in pavement cracks. Medium sand works well for gravel and small chunks of debris. The problem arises when you cover the entire base with a single grain size: the ground loses its definition and ends up looking like a painted gray beach.
For a more controlled urban finish, apply texture selectively. Place fine sand around the edges of your cork pieces, inside cracks, and alongside terrain elements. Leave flat patches visible so they read clearly as cement, tile, or asphalt. This contrast in surfaces gives even a simple base visual depth.
Textured pastes are a practical alternative when you want speed and uniformity. A fine-grain paste works well for worn concrete floors; a coarser grain can represent a heavily deteriorated roadway. Apply them with a spatula or an old brush, but avoid laying it on too thick. The miniature must remain the star of the show, not sink into a heavy mass of texture.
It is also worth incorporating brick dust, ultra-fine gravel, or small flakes of broken plaster. Plaster has a very natural fracture pattern for rubble, though it is more fragile than other materials. If you use it, seal it thoroughly with diluted white glue before painting to minimize flaking.
Believable Debris Without Overcrowding the Base
Rubble is what sells an urban scene, but it requires moderation. An infantry miniature doesn't need an entire wall under its feet to suggest a ruined city. Two or three well-chosen pieces are usually enough: a single brick, a broken steel beam, and a fragment of pipe, for example.
To make scale-accurate bricks, cut strips of plastic card, dense cardboard, or cured putty. They should be smaller than what your eye initially asks for. Once painted and grouped together, their realism improves dramatically. Leftover sprue bits, matchsticks, or plastic profiles can double as wooden planks or support beams. Practicing diagonal cuts, scratches, and breaks prevents them from looking like freshly cut craft wood.
Fine wires, copper wire, and plastic sprue offcuts work wonderfully for electrical cables, exposed pipes, and rebar. They don’t all need to be straight: a bent wire sticking out of a block of concrete adds an instant sense of destruction. Just remember to trim any tips that poke past the rim of the base—otherwise, they can snag on other miniatures, foam transport trays, or terrain during gameplay.
If you are looking for ready-to-use pieces, ruin elements and scatter terrain accessories from Terrainandminis.com allow you to add high-detail rubble while keeping a consistent scale with the rest of the table. They are especially useful when you need to prep large army units without spending hours cutting individual bricks by hand.
Storytelling Details
An urban base gains true personality when it introduces signs of everyday life, not just destruction. A fallen street sign, a floor grate, a supply crate, a barrel, or a broken section of chain-link fence instantly anchors the miniature in a specific setting. These elements should tie into your army's faction, the game system, or the theme of the city you are building.
-
Industrial District: Corrugated plastic, metal floor grates, and piping make more sense than stone rubble.
-
Historic Devastated City: Bricks, cobblestones, and splintered wood work best.
-
Futuristic Megacity: Cables, control panels, and plastic plating can almost entirely replace conventional sand.
Vegetation has a place on urban bases too, but it should only appear where it logically would. A bit of static grass sprouting through cracks, a small weed patch next to a wall, or moss in a damp corner breaks up the monotony of gray tones without turning the street into a meadow. Muted, desaturated tones blend in much better than bright spring green, unless your project deliberately depicts a city completely reclaimed by nature.
Painting, Pigments, and Effects to Unify Materials
A great construction job can fall flat if every material keeps its original color. Primer is the essential first step to unifying cork, sand, plastic, and putty. Black provides deep shadows and is practical for dark ruins; gray or brown speeds up concrete, dust, and earth color schemes.
For cement and asphalt, start with a medium or dark gray base and build up subtle variations. Light drybrushing picks out edges, but avoid abusing pure white. A very light gray, cool beige, or bone tone usually delivers a much more realistic result. Brown, black, and greenish washes add grime to recesses and low points.
Pigments are exceptionally effective on urban bases because they kill the plastic sheen of paint. A dust-colored pigment can tie the rubble and the miniature's boots together visually. Rust tones work wonders around pipes, beams, and grates. Apply them with a soft brush and fix them in place according to the finish you want: fully sealed for heavy gaming use, or partially loose for a rich, ultra-matte, dusty look.
Water and moisture effects should be used with intention. A resin puddle or water effect looks great inside a pothole, next to a drain grate, or beneath a leaky pipe—not as a random glossy layer spread across the entire base. Adding a touch of greenish-brown tint around the edges helps blend it seamlessly into the terrain.
Common Mistakes When Preparing a Full Unit
Coherence between bases matters more than individual complexity. Before starting a whole unit, prepare three or four test bases. Check that the miniatures fit properly in formation, that terrain elements don't block weapons or cloaks, and that the color scheme reads well from gaming distance.
It is also wise to limit your palette of materials. If every single base has cobblestones, bricks, wires, barrels, grass, signs, and puddles, the army loses its visual identity. Stick to a common foundation—for example, gray asphalt, reddish dust, and rusted metal—and reserve special, unique details for character models, heavy weapons, or command squads.
Glue choice is another critical point. White PVA glue is great for sand and flock, while cyanoacrylate (super glue) secures plastic, metal, and resin pieces. For heavy elements or bases that will undergo heavy handling during transport and play, a thin layer of putty or a stronger adhesive beneath the piece offers a much firmer grip than relying on a single drop of glue.
An urban base succeeds when it feels like a small window into a much larger, unseen city. Start with a clean surface, add minimal scale-appropriate rubble, and let paint tie everything together. Afterward, let a crack, a rusted pipe, or a dusting of pigment around the boots do the rest.